analitics

Pages

Showing posts with label google. Show all posts

Wednesday, June 1, 2022

Python 3.7.13 : My colab tutorials - part 024.

In this colab notebook I test how to install pytorch and torchvision python packages on colab notebook and save the model to Google drive.
I tried to save the model.ptl file but I got a network error and uploaded the file to googe drive and then downloaded it.
You can see the full source code on this GitHub repo.

Saturday, February 26, 2022

Python 3.7.12 : My colab tutorials - part 023.

NVIDIA announces TensorRT 8.2 and Integrations with PyTorch and TensorFlow on Dec 02, 2021.
This Torch-TensorRT is a high-performance deep learning inference optimizer and runtime that delivers low latency, high-throughput inference for AI applications. TensorRT is used across several industries including healthcare, automotive, manufacturing, internet/telecom services, financial services, and energy.
I tested today using my gavatar image on colab notebook with the GPU device.
Am prelucrat un cod sursa exemplu existent de pe internet cu o un model RESNET known as Deep Residual Learning for Image Recognition, see this website.
model = models.resnet50(pretrained=True).to("cuda")
I have a pretty good picture of the processing possibilities given for this topic and I can tell you today that this implementation of TensorRT is below my expectations.
However, there are some positive elements that can be used with this in the future.
The full exaemple and how can be used TensorRT with colab tool can be found on my GitHub repo with all colabs notebooks.

Sunday, December 26, 2021

Python 3.7.11 : My colab tutorials - part 022.

Here is another notebook with two python scripts.
You may be wondering why I add them here and the index of 022 blog posts does not match the 026 index of those on the GitHub website.
The answer is simple: here I post them when I have time for evaluation and there they are added when they are created and tested.
The posts here are for a share of those who want to learn simple python programming to solve common issues by anyone with minimal school knowledge and for supporting the python programming community.
In this notebook you will find a script that uses a python packet that does a simple search using Google and one that does an image search.

Wednesday, November 17, 2021

Python 3.7.11 : My colab tutorials - part 021.

This is a simple notebook tutorial about how can test and get info from GPU on colab online tool.
This tutorial can be found on my GitHub account.

Tuesday, November 16, 2021

Python 3.7.11 : My colab tutorials - part 020.

The tutorial I created is a test and use of the Selenium WebDriver python package for to automate web browser interaction from Python.
This tutorial can be found on my GitHub account.

Saturday, October 30, 2021

Python 3.7.11 : My colab tutorials - part 019.

The tutorial I created is a test and use Probabilistic Graphical Models for the most basic problem the coin problem with the pgmpy python module.
This tutorial can be found on my GitHub account.

Saturday, September 18, 2021

Python 3.7.11 : My colab tutorials - part 018.

In this colab tutorial, you can see how to use the webcam with python and javascript.
This colab notebook can be found on my colab project on the GitHub webpage.
  • catafest_001.ipynb - first step, import TensorFlow;
  • catafest_002.ipynb - testing the GPU , Linux commands and python modules torch and fastai;
  • catafest_003.ipynb - testing the Altair;
  • catafest_004.ipynb - testing the cirq python package for quantum computing;
  • catafest_005.ipynb - using the estimator on tensoflow 2.0;
  • python_imdb_001.ipynb - using the colab with python module imdbpy;
  • catafest_006.ipynb - google authentification and google.colab drive and files
  • catafest_007.ipynb - test with https://github.com/harrism/numba_examples/blob/master/mandelbrot_numba.ipynb
  • catafest_008.ipynb - few simple examples with selenium and chromium-chromedriver;
  • catafest_009.ipynb - show you how to use %% colab features;
  • catafest_010.ipynb - example with Detectron2 is Facebook AI Research's with state-of-the-art object detection algorithms;
  • catafest_011.ipynb - test a sound classification with YAMNet from a web example - not very happy with the result;
  • catafest_012.ipynb - a simple tutorial about Colab tool and HTML and JavaScript with examples;
  • catafest_013.ipynb - a simple tutorial with settings for TPU and IMDB dataset;
  • catafest_014.ipynb - get IMDB review dataset and show it;
  • catafest_015.ipynb - how to get, show and use it data and create a new train data set from IMDB dataset;
  • catafest_016.ipynb - show the shape of the Fashion-MNIST dataset;
  • catafest_017.ipynb - this example show you how to write another python script in colab and run it;
  • catafest_018.ipynb - PIFuHD demo;
  • catafest_019.ipynb - get title from tiles.virtualearth.net;
  • catafest_020.ipynb - get video from youtube with pytube, converting to audio, show signal wave, energy and frequency;
  • catafest_021.ipynb - BERT is a transformers model with example and sentiment-analysis;
  • catafest_022.ipynb - webcam on colab with python and javascript;

Saturday, September 11, 2021

Python 3.7.11 : My colab tutorials - part 017.

BERT: Pre-training of Deep Bidirectional Transformers for Language Understanding, see this https://arxiv.org/abs/1810.04805.
See this colab notebook with examples at my GitHub account.

Thursday, September 2, 2021

Python 3.7.11 : My colab tutorials - part 016.

This new colab notebook comes with: get youtube videos with pytube, converting to audio, show signals, energy and frequency.
You can see this work on the GitHub account.

Saturday, August 28, 2021

Python 3.7.11 : My colab tutorials - part 015.

Google Maps explicitly forbid using map tiles offline or caching them, but I think Microsoft Bing Maps don't say anything explicitly against it, and I guess you are not planning to use your program commercially (?)
This colab notebook show you how to get a title from tiles.virtualearth.net.
The source code is simple:
class TileServer(object):
    def __init__(self):
        self.imagedict = {}
        self.mydict = {}
        self.layers = 'ROADMAP'
        self.path = './'
        self.urlTemplate = 'http://ecn.t{4}.tiles.virtualearth.net/tiles/{3}{5}?g=0'
        self.layerdict = {'SATELLITE': 'a', 'HYBRID': 'h', 'ROADMAP': 'r'}

    def tiletoquadkey(self, xi, yi, z, layers):
        quadKey = ''
        for i in range(z, 0, -1):
            digit = 0
            mask = 1 << (i - 1)
            if(xi & mask) != 0:
                digit += 1
            if(yi & mask) != 0:
                digit += 2
            quadKey += str(digit)
        return quadKey

    def loadimage(self, fullname, tilekey):
        im = Image.open(fullname)
        self.imagedict[tilekey] = im
        return self.imagedict[tilekey]

    def tile_as_image(self, xi, yi, zoom):
        tilekey = (xi, yi, zoom)
        result = None
        try:
            result = self.imagedict[tilekey]
            print(result)
        except:
            print(self.layers)
            filename = '{}_{}_{}_{}.jpg'.format(zoom, xi, yi, self.layerdict[self.layers])
            print("filename is " + filename)
            fullname = self.path + filename
            try:
                result = self.loadimage(fullname, tilekey)
            except:
                server = random.choice(range(1,4))
                quadkey = self.tiletoquadkey(*tilekey)
                print (quadkey)
                url = self.urlTemplate.format(xi, yi, zoom, self.layerdict[self.layers], server, quadkey)
                print ("Downloading tile %s to local cache." % filename)
                urllib.request.urlretrieve(url, fullname)
                #urllib.urlretrieve(url, fullname)
                result = self.loadimage(fullname, tilekey)
        return result

Tuesday, June 15, 2021

Python 3.6.9 : My colab tutorials - part 014.

Here we come to the 16th notebook created with the colab utility from Google.
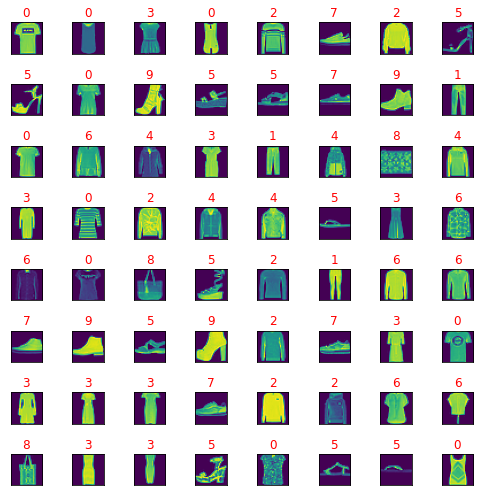
In this notebook, I will show you how you can view a dataset of images.
See the next image with a few of the shapes of the dataset:
You can find the full source code on my GitHub account.

Saturday, June 5, 2021

Python 3.6.9 : My colab tutorials - part 013.

In this tutorial created with the online tool google colab, we exemplified again how to access the IMDB dataset, which contains from the index point of view and what is the correspondence with the IMDB reviews, as well as how to work and create several sets of data for trains and what is the difference between them.
You can see the source code in python on this notebook.

Tuesday, June 1, 2021

Python 3.6.9 : My colab tutorials - part 012.

The purpose of this tutorial is to show the IMDB review dataset.
You can find the source code on my GitHub account here.

Thursday, May 27, 2021

Python 3.6.9 : My colab tutorials - part 011.

The purpose of this tutorial is to use the google TPU device together with Keras.
You need to set from the Edit menu and set for the notebook the device called TPU.
You can find the source code on my GitHub account here.

Saturday, February 27, 2021

Python 2.7.18 : Kick Start Google - Boring Numbers.

Today I solved one of the problems required for solving Google Kick Start in 2020, see on my account.
Round H 2020 - Kick Start 2020 Boring Numbers (7pts, 12pts) Problem Ron read a book about boring numbers. According to the book, a positive number is called boring if all of the digits at even positions in the number are even and all of the digits at odd positions are odd. The digits are enumerated from left to right starting from 1. For example, the number 1478 is boring as the odd positions include the digits {1, 7} which are odd and even positions include the digits {4, 8} which are even. Given two numbers L and R, Ron wants to count how many numbers in the range [L, R] (L and R inclusive) are boring. Ron is unable to solve the problem, hence he needs your help.
Let's try to find the solution:
import math
print("Round H 2020 - Kick Start 2020: Detect is positive number is called boring.\n")
nr = int(input("get natural positive number: "))

all_cond = []
# detect if the number is odd or even number
def detect_odd_even(num):
  if (num % 2) == 0:  
    #print("{0} is Even number".format(num)) 
    detect = True  
  else:  
    #print("{0} is Odd number".format(num))  
    detect = False
  return detect
# check if is an boring number.
def boring_number(num):
    for p,num in enumerate(str(num),1):
        print(p,num)
        if (detect_odd_even(p) == detect_odd_even(int(num))): all_cond.append(True)
        else:
          all_cond.append(False)

# check the number is 
boring_number(nr)
# print result if the positive number is boring
if (all(all_cond) == True): print("{0} is an positive boring number".format(nr))
else:
  print("{0} is not a positive boring number".format(nr))
Let's test it:
~/mathissues$ python math_003.py 
Round H 2020 - Kick Start 2020: Detect is positive number is called boring.

get natural positive number: 345
(1, '3')
(2, '4')
(3, '5')
345 is an positive boring number
Then la last step is to test any number from range of given two numbers L and R.
The new source code is this:
import math
print("Round H 2020 - Kick Start 2020: Detect is positive number is called boring.\n")
#nr = int(input("get natural positive number: "))

all_cond = []
# detect if the number is odd or even number
def detect_odd_even(num):
  if (num % 2) == 0:  
    #print("{0} is Even number".format(num)) 
    detect = True  
  else:  
    #print("{0} is Odd number".format(num))  
    detect = False
  return detect
# check if is an boring number.
def boring_number(num):
    for p,num in enumerate(str(num),1):
        print(p,num)
        if (detect_odd_even(p) == detect_odd_even(int(num))): all_cond.append(True)
        else:
          all_cond.append(False)

# check the number is 
#boring_number(nr)
# print result if the positive number is boring

nr1 = int(input("get firt natural positive number: "))
nr2 = int(input("get firt natural positive number: "))
if nr1 < nr2:
  n1 = nr1
  n2 = nr2
else: 
  n1 = nr2
  n2 = nr1
for all_nr in range(n1,n2):
  all_cond = []
  boring_number(all_nr)
  print(all_nr)
# print result if the positive number is boring
  if (all(all_cond) == True): print("{0} is an positive boring number".format(all_nr))
  else: print("{0} is not a positive boring number".format(all_nr))
  all_cond = [] 
The final solution result to test all numbers in range given two numbers L and R can be see bellow:
~/mathissues$ python math_003.py 
Round H 2020 - Kick Start 2020: Detect is positive number is called boring.

get firt natural positive number: 11
get firt natural positive number: 16
(1, '1')
(2, '1')
11
11 is not a positive boring number
(1, '1')
(2, '2')
12
12 is an positive boring number
(1, '1')
(2, '3')
13
13 is not a positive boring number
(1, '1')
(2, '4')
14
14 is an positive boring number
(1, '1')
(2, '5')
15
15 is not a positive boring number
Sunday, December 6, 2020

Python 3.6.9 : My colab tutorials - part 010.

In this tutorial created with Colab online tool I used HTML and JavaScript source code.
The tutorial is easy to understand and use it.
You can see all my examples of my GitHub repo.

Thursday, December 3, 2020

Python 3.6.9 : My colab tutorials - part 009.

I update may colab work and I add new notebooks.
You can see all of these on my GitHub account.
These are examples:
  • catafest_009.ipynb - show you how to use %% colab features;
  • catafest_010.ipynb - example with Detectron2 is Facebook AI Research's with state-of-the-art object detection algorithms;
  • catafest_011.ipynb - test a sound classification with YAMNet from a web example - not very happy with the result;

Tuesday, August 4, 2020

Python 3.6.9 : My colab tutorials - part 008.

Today I deal with these two python packages named selenium and chromium-chromedriver.
I used selenium to get pieces of information from webpages.
These examples can be found at my GitHub project colab on the notebook named catafest_008.

Sunday, July 26, 2020

Python 3.6.9 : My colab tutorials - parts 006 - 007.

This tutorial is called: My colab tutorials - parts 006 - 007.
The only reason for synchronization with the source code from my GitHub account on the Colab project.
I like collab more and more because I can quickly test the source code.
The example is taken from here and adapted to work on Colab and the new version of numba
Here is a simple example with the python numba package to creat that Mandelbrot fractal set.
import numba
from numba import jit

@jit
def mandel(x, y, max_iters):
  """
    Given the real and imaginary parts of a complex number,
    determine if it is a candidate for membership in the Mandelbrot
    set given a fixed number of iterations.
  """
  c = complex(x, y)
  z = 0.0j
  for i in range(max_iters):
    z = z*z + c
    if (z.real*z.real + z.imag*z.imag) >= 4:
      return i

  return max_iters

@jit
def create_fractal(min_x, max_x, min_y, max_y, image, iters):
  height = image.shape[0]
  width = image.shape[1]

  pixel_size_x = (max_x - min_x) / width
  pixel_size_y = (max_y - min_y) / height
    
  for x in range(width):
    real = min_x + x * pixel_size_x
    for y in range(height):
      imag = min_y + y * pixel_size_y
      color = mandel(real, imag, iters)
      image[y, x] = color

image = np.zeros((1024, 1536), dtype = np.uint8)
start = timer()
create_fractal(-2.0, 1.0, -1.0, 1.0, image, 20) 
dt = timer() - start

print ("Mandelbrot created in %f s" % dt)
imshow(image)
show() 

Friday, June 26, 2020

Python 3.6.9 : My colab tutorials - part 005.

Today I tested google colab python features with google authentification and google.colab drive and files.
The first part of google colab code comes with authentification and you need to add the verification code for google account.
The google colab use the same version of python:
3.6.9 (default, Apr 18 2020, 01:56:04) [GCC 8.4.0]
You can see all source code on my GitHub account.
The notebook can be found here.