Today, I tested the python module named imdbpy with Colab Google features.
This show you how easy can build and run a simple python script to take data from web sites.
You can see the full example on my GitHub account.
Showing posts with label google. Show all posts
Showing posts with label google. Show all posts
Sunday, April 19, 2020
Tuesday, March 17, 2020
Python 3.6.9 : My colab tutorials - part 003.
This tutorial refers to a python module named cirq.
The documentation of this python module can be found on this website.
The development team comes with this intro:
Cirq is a software library for writing, manipulating, and optimizing quantum circuits and then running them against quantum computers and simulators. Cirq attempts to expose the details of hardware, instead of abstracting them away, because, in the Noisy Intermediate-Scale Quantum (NISQ) regime, these details determine whether or not it is possible to execute a circuit at all.
I try to install on Ubuntu but not work:
See my GitHub account with the catafest_004.ipynb notebook example and basic pieces of information.
A very short intro into quantum computing area can be found on this video:
The documentation of this python module can be found on this website.
The development team comes with this intro:
Cirq is a software library for writing, manipulating, and optimizing quantum circuits and then running them against quantum computers and simulators. Cirq attempts to expose the details of hardware, instead of abstracting them away, because, in the Noisy Intermediate-Scale Quantum (NISQ) regime, these details determine whether or not it is possible to execute a circuit at all.
I try to install on Ubuntu but not work:
$ lsb_release -a
No LSB modules are available.
Distributor ID: Ubuntu
Description: Ubuntu 16.04.6 LTS
Release: 16.04
Codename: xenial
...
$ pip3 install cirq --user
Requirement already satisfied: cirq in ./.local/lib/python3.5/site-packages (0.5.556)
...
$ python3 -c 'import cirq; print(cirq.google.Foxtail)'
Traceback (most recent call last):
  File "", line 1, in
ImportError: No module named 'cirq' See my GitHub account with the catafest_004.ipynb notebook example and basic pieces of information.
A very short intro into quantum computing area can be found on this video:
Wednesday, March 4, 2020
Python 3.6.9 : My colab tutorials - part 002.
This is another notebook with the Altair python package.
The development team comes with this intro:
Altair is a declarative statistical visualization library for Python, based on Vega and Vega-Lite.
Altair offers a powerful and concise visualization grammar that enables you to build a wide range of statistical visualizations quickly. Here is an example of using the Altair API to quickly visualize a dataset with an interactive scatter plot:
See the notebook at my GitHub account.
Sunday, March 1, 2020
Python 3.6.9 : My colab tutorials - part 001.
Today I start this tutorials series for the Colab tool.
To share my working with the Colab tool I created this GitHub project.
This project has two colab files :
The next colab notebook is a little bit more complex and shares more information about how can deal with simples tasks on colab.
This is the table of contests for this colab notebook:
To share my working with the Colab tool I created this GitHub project.
This project has two colab files :
catafest_001.ipynb  Created using Colaboratory
catafest_002.ipynb Created using Colaboratory The next colab notebook is a little bit more complex and shares more information about how can deal with simples tasks on colab.
This is the table of contests for this colab notebook:
- Table of contents
- Select GPU for this notebook
- Check with nvidia-smi
- Check whether you have a visible GPU
- Check with tensoflow test
- Read information about hardware
- Check cpuinfo
- Check meminfo
- Use Linux commands
- Use python modules torch and fastai
- Use python modules
- Show and get information
- Enter credentials with Username and Password:
- Datatime fields
- Raw fields
- Number fields
- Boolean fields
- Pandas data fields
- Upload files
- Upload local files
- Use the Jupyter Widgets
Thursday, February 27, 2020
Python 3.6.9 : Google give a new tool for python users.
Today I discovered a real surprise gift made by the team from Google for the evolution of programmers.
I say this because not everyone can afford hardware resources.
This gift is a new tool called Colab and uses these versions of python and sys:
Colab allows you to use and share Jupyter notebooks because is an open-source project on which Colab is based.
The types of GPUs that are available in Colab varies over time.
This is necessary for Colab to be able to provide access to these resources for free.
The GPUs available in Colab often include Nvidia K80s, T4s, P4s, and P100s.
This way you can test demanding modules like the python TensorFlow module.
The utility is free but you can pay extra for more hardware resources.
Colab notebooks are stored in Google Drive, or can be loaded from GitHub.
You can see a simple intro with a notebook on my GitHub account.
I say this because not everyone can afford hardware resources.
This gift is a new tool called Colab and uses these versions of python and sys:
Python version
3.6.9 (default, Nov  7 2019, 10:44:02)
[GCC 8.3.0]
Version info.
sys.version_info(major=3, minor=6, micro=9, releaselevel='final', serial=0)Colab allows you to use and share Jupyter notebooks because is an open-source project on which Colab is based.
The types of GPUs that are available in Colab varies over time.
This is necessary for Colab to be able to provide access to these resources for free.
The GPUs available in Colab often include Nvidia K80s, T4s, P4s, and P100s.
This way you can test demanding modules like the python TensorFlow module.
The utility is free but you can pay extra for more hardware resources.
Colab notebooks are stored in Google Drive, or can be loaded from GitHub.
You can see a simple intro with a notebook on my GitHub account.
Sunday, December 22, 2019
Python 3.7.5 : The new PyQt5 released.
The PyQt v5.14.0 has been released with support for Qt v5.14.0.
[mythcat@desk ~]$ pip3 install --upgrade PyQt5 --user
Collecting PyQt5
...
Installing collected packages: PyQt5-sip, PyQt5
Successfully installed PyQt5-5.14.0 PyQt5-sip-12.7.0[mythcat@desk ~]$ python3
Python 3.7.5 (default, Dec 15 2019, 17:54:26)
[GCC 9.2.1 20190827 (Red Hat 9.2.1-1)] on linux
Type "help", "copyright", "credits" or "license" for more information.
>>> from PyQt5.Qt import PYQT_VERSION_STR
>>> print("PyQt version:", PYQT_VERSION_STR)
PyQt version: 5.14.0Saturday, December 21, 2019
Python 3.7.5 : Simple web search with google python package.
This is a simple search on the web with python google package.
From the python package, I need to import just the search and used it.
The python package need a variable string named query.
The search wants to know the words from query and arguments, see the help:
[mythcat@desk ~]$ pip3 install google --user
Collecting google
...
Installing collected packages: google
Successfully installed google-2.0.3From the python package, I need to import just the search and used it.
The python package need a variable string named query.
The search wants to know the words from query and arguments, see the help:
Help on function search in module googlesearch:

search(query, tld='com', lang='en', tbs='0', safe='off', num=10, start=0, stop=None,
domains=None, pause=2.0, tpe='', country='', extra_params=None, user_agent=None)
Search the given query string using Google.
:param str query: Query string. Must NOT be url-encoded.
:param str tld: Top level domain.
:param str lang: Language.
:param str tbs: Time limits (i.e "qdr:h" => last hour,
"qdr:d" => last 24 hours, "qdr:m" => last month).
:param str safe: Safe search.
:param int num: Number of results per page.
:param int start: First result to retrieve.
:param int stop: Last result to retrieve.
Use None to keep searching forever.
:param list domains: A list of web domains to constrain
the search.
:param float pause: Lapse to wait between HTTP requests.
A lapse too long will make the search slow, but a lapse too short may
cause Google to block your IP. Your mileage may vary!
:param str tpe: Search type (images, videos, news, shopping, books, apps)
Use the following values {videos: 'vid', images: 'isch',
news: 'nws', shopping: 'shop', books: 'bks', applications: 'app'}
:param str country: Country or region to focus the search on. Similar to
changing the TLD, but does not yield exactly the same results.
Only Google knows why...
:param dict extra_params: A dictionary of extra HTTP GET
parameters, which must be URL encoded. For example if you don't want
Google to filter similar results you can set the extra_params to
{'filter': '0'} which will append '&filter=0' to every query.
:param str user_agent: User agent for the HTTP requests.
Use None for the default.
:rtype: generator of str
:return: Generator (iterator) that yields found URLs.
If the stop parameter is None the iterator will loop forever.
[mythcat@desk ~]$ python3
Python 3.7.5 (default, Dec 15 2019, 17:54:26)
[GCC 9.2.1 20190827 (Red Hat 9.2.1-1)] on linux
Type "help", "copyright", "credits" or "license" for more information.
>>> from googlesearch import search
>>> query = "protv news 2019"
>>> my_results_list = []
>>> for url in search(query,
...     tld = 'com',
...     lang = 'en',
...     num = 10,
...     start = 0,
...     stop = None,
...     pause = 2.0,):
...     my_results_list.append(url)
...     print(url)
...
https://stirileprotv.ro/protvnews/
https://stirileprotv.ro/
https://stirileprotv.ro/superbun/protv-news.html
https://www.facebook.com/ProTvNews/
https://www.youtube.com/playlist?list=PLCJaU-QvLGR_FSZw6yeqBJHDe9LgFDRdy
https://www.youtube.com/watch?v=HaiQtDlaNic
https://www.youtube.com/watch?v=hxMEgAANSl4
https://www.youtube.com/channel/UCbbDChpDluLkdnH8QMwN6qA
https://www.youtube.com/watch?v=5zuN9uWFcTE
https://protvplus.ro/tv-live/1-pro-tv
https://en.wikipedia.org/wiki/Pro_TV
https://pro-tv.com/news/page/2/
https://m.youtube.cat/channel/UCbbDChpDluLkdnH8QMwN6qA
...Wednesday, April 24, 2019
Google's Python Class - another step.
Here's something I like and I hope it should be known in the Python community.
Some people from Google want to attract the python community into a learning process.
Although most of the API documentation examples do not exist in the Python programming language, they have not disappeared.
Let's hope this little step will increase the chances of programming Google with the Python programming language.
This material was created by Nick Parlante working in the engEDU group at Google.
Welcome to Google's Python Class -- this is a free class for people with a little bit of programming experience who want to learn Python. The class includes written materials, lecture videos, and lots of code exercises to practice Python coding. These materials are used within Google to introduce Python to people who have just a little programming experience. The first exercises work on basic Python concepts like strings and lists, building up to the later exercises which are full programs dealing with text files, processes, and http connections. The class is geared for people who have a little bit of programming experience in some language, enough to know what a "variable" or "if statement" is. Beyond that, you do not need to be an expert programmer to use this material.
Read more about this course here.
Monday, November 19, 2018
Using Google Classroom API with python.
Today I read and test Google API with the Python programming language.
You can find a good example here.
The example shows how to read with Google Classroom API, v1.
This example can be used as a default example if you want to use googlescopes.
The Google documentation tells us:
This document lists the OAuth 2.0 scopes that you might need to request to access Google APIs, depending on the level of access you need. Sensitive scopes require review by Google and have a sensitive indicator on the Google Cloud Platform (GCP) Console's OAuth consent screen configuration page. Many scopes overlap, so it's best to use a scope that isn't sensitive. For information about each method's scope requirements, see the individual API documentation.
The script use credentials.json file created by the Google project in the folder with the python script.
The script creates automatically when the authorization flow completes a token.json file.
The control of the project can be used with the Google Cloud Console.
The result of the example script can be seen in the next image:
Sunday, June 24, 2018
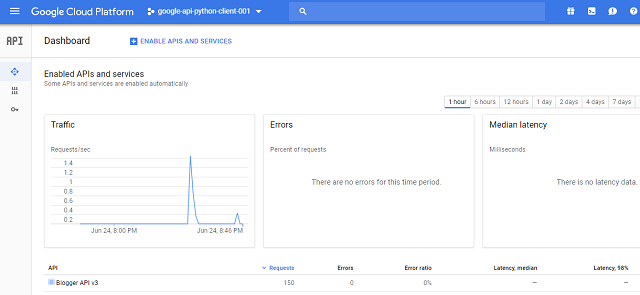
Python 3.6.4 : Using python client with blogger API .
I used a new project into console cloud google.
I used the google-api-python-client from here with OAuth service.
You need to create a project and add the blogger API to use it.
For credentials, I used OAuth with the JSON file from google.
This is the source code:
Run the python script:

Google show us all the infos about this project into dashboard:
I used the google-api-python-client from here with OAuth service.
You need to create a project and add the blogger API to use it.
For credentials, I used OAuth with the JSON file from google.
This is the source code:
#!/usr/bin/env python
# -*- coding: utf-8 -*-
from __future__ import print_function

__author__ = 'Catalin George Festila ( catafest , mythcat )'

import sys

from oauth2client import client
from googleapiclient import sample_tools


def main(argv):
  # Authenticate and construct service.
  service, flags = sample_tools.init(
      argv, 'blogger', 'v3', __doc__, __file__,
      scope='https://www.googleapis.com/auth/blogger')

  try:

      users = service.users()

      # Retrieve this user's profile information
      thisuser = users.get(userId='self').execute()
      print('This user\'s display name is: %s' % thisuser['displayName'])

      blogs = service.blogs()

      # Retrieve the list of Blogs this user has write privileges on
      thisusersblogs = blogs.listByUser(userId='self').execute()
      for blog in thisusersblogs['items']:
        print('The blog named \'%s\' is at: %s' % (blog['name'], blog['url']))

      posts = service.posts()

      # List the posts for each blog this user has
      for blog in thisusersblogs['items']:
        print('The posts for %s:' % blog['name'])
        request = posts.list(blogId=blog['id'])
        while request != None:
          posts_doc = request.execute()
          if 'items' in posts_doc and not (posts_doc['items'] is None):
            for post in posts_doc['items']:
              print('  %s (%s)' % (post['title'], post['url']))
          request = posts.list_next(request, posts_doc)

  except client.AccessTokenRefreshError:
    print ('The credentials have been revoked or expired, please re-run'
      'the application to re-authorize')

if __name__ == '__main__':
  main(sys.argv)
c:\Python364\google_api_python>dir
06/24/2018  08:27 PM             1,096 blogger.dat
06/24/2018  07:49 PM             2,599 blogger.py
06/24/2018  08:24 PM               309 client_secrets.json
06/24/2018  08:26 PM                76 debug.log
               4 File(s)          4,080 bytes
               2 Dir(s)  201,382,006,784 bytes free
Run the python script:
c:\Python364\google_api_python>python.exe blogger.pyGoogle show us all the infos about this project into dashboard:
Saturday, March 17, 2018
The Google Cloud SDK - part 003 .
The webapp2 is a lightweight Python web framework compatible with Google App Engine’s.
The webapp2 project, by Rodrigo Moraes, started as a fork of the App Engine web app framework.
The webapp2 includes a number of features such as improved support for URI routing, session management and localization.
You can see google documentation about this python module this link.
They say:
"webapp2 is compatible with the WSGI standard for Python web applications. You don't have to use webapp2 to write Python applications for App Engine. Other web application frameworks, such as Django, work with App Engine, and App Engine supports any Python code that uses the CGI standard. "
This is default start python example from Google Cloud SDK tested in the last tutorial.
This file: main.py is set into setting file app.yaml like the script: main.app.
Let's make some changes.
The default project is set with --promote true the result is: after a number of uploads you got this error:
Then you can make the upload with the command :
The webapp2 project, by Rodrigo Moraes, started as a fork of the App Engine web app framework.
The webapp2 includes a number of features such as improved support for URI routing, session management and localization.
You can see google documentation about this python module this link.
They say:
"webapp2 is compatible with the WSGI standard for Python web applications. You don't have to use webapp2 to write Python applications for App Engine. Other web application frameworks, such as Django, work with App Engine, and App Engine supports any Python code that uses the CGI standard. "
This is default start python example from Google Cloud SDK tested in the last tutorial.
import webapp2

class MainPage(webapp2.RequestHandler):
    def get(self):
        self.response.headers['Content-Type'] = 'text/plain'
        self.response.write('Hello, World!')

app = webapp2.WSGIApplication([
    ('/', MainPage),
], debug=True)C:\Python27>cd python-docs-samples\appengine\standard\hello_world
C:\Python27\python-docs-samples\appengine\standard\hello_world>gcloud app deploy app.yaml
Services to deploy:
descriptor: [C:\Python27\python-docs-samples\appengine\standard\hello_world\app.yaml]
source: [C:\Python27\python-docs-samples\appengine\standard\hello_world]
target project: [xxxxxx]
target service: [default]
target version: [xxxxxxxxxxxxx]
target url: [https://xxxxxx.appspot.com]
Do you want to continue (Y/n)? y
Beginning deployment of service [default]...This file: main.py is set into setting file app.yaml like the script: main.app.
Let's make some changes.
The default project is set with --promote true the result is: after a number of uploads you got this error:
ERROR: (gcloud.app.deploy) Error Response: [400] Your app may not have more than 15 versions.Please delete one of the existing versions before trying to create a new version.
...Then you can make the upload with the command :
gcloud app deploy app.yamlgcloud app deploy app.yaml --stop-previous-versiongcloud config listgcloud versionC:\Python364\Scripts>pip install webapp2
Requirement already satisfied: webapp2 in c:\python364\lib\site-packages
2 python-dateutil-2.7.0 setuptools-39.0.0 Friday, January 12, 2018
Python 2.7 : Python and BigQuery service object.
Here's another tutorial about python and google. I thought it would be useful for the beginning of 2018.
The Google team tell us:
What is BigQuery?
Storing and querying massive datasets can be time consuming and expensive without the right hardware and infrastructure. Google BigQuery is an enterprise data warehouse that solves this problem by enabling super-fast SQL queries using the processing power of Google's infrastructure. Simply move your data into BigQuery and let us handle the hard work. You can control access to both the project and your data based on your business needs, such as giving others the ability to view or query your data.
This tutorial it follows more precisely the steps from here.
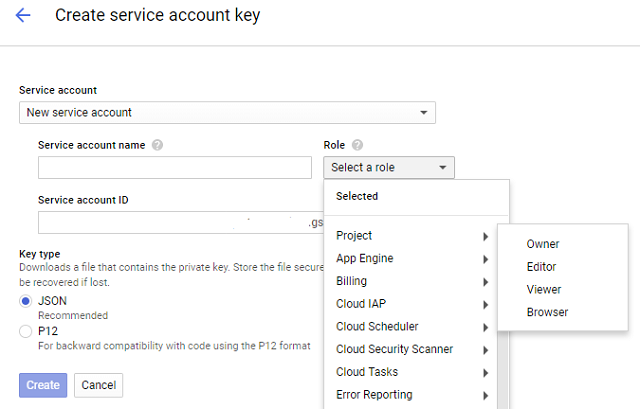
First of all, you must create an authentication file by using the Create service account from your Google project.
Go to Google Console, navigate to the Create service account key page.
From the Service account drop-down, select the New service account.
Input a name into the form field.
From the Role drop-down, select Project and Owner.
The result is a JSON file type (this is for authenticating with google) download it renames and put into your project folder.
Like into the next image:
Now, select from the left area the Library does add the BigQuery API, try this link.
Search for BigQuery API and then use the button ENABLE to use it.
The next step is to install these python modules: pyopenssl and google-cloud-bigquery.
Let's see the script:
The Google team tell us:
What is BigQuery?
Storing and querying massive datasets can be time consuming and expensive without the right hardware and infrastructure. Google BigQuery is an enterprise data warehouse that solves this problem by enabling super-fast SQL queries using the processing power of Google's infrastructure. Simply move your data into BigQuery and let us handle the hard work. You can control access to both the project and your data based on your business needs, such as giving others the ability to view or query your data.
This tutorial it follows more precisely the steps from here.
First of all, you must create an authentication file by using the Create service account from your Google project.
Go to Google Console, navigate to the Create service account key page.
From the Service account drop-down, select the New service account.
Input a name into the form field.
From the Role drop-down, select Project and Owner.
The result is a JSON file type (this is for authenticating with google) download it renames and put into your project folder.
Like into the next image:
Now, select from the left area the Library does add the BigQuery API, try this link.
Search for BigQuery API and then use the button ENABLE to use it.
The next step is to install these python modules: pyopenssl and google-cloud-bigquery.
C:\Python27\Scripts>pip install -U pyopenssl
C:\Python27\Scripts>pip install --upgrade google-cloud-bigqueryset GOOGLE_APPLICATION_CREDENTIALS=C:\test\python_doc.jsonLet's see the script:
import google
from google.cloud import bigquery

def query_shakespeare():
    client = bigquery.Client()
    client = client.from_service_account_json('python_doc.json')
    query_job = client.query("""
        #standardSQL
        SELECT corpus AS title, COUNT(*) AS unique_words
        FROM `bigquery-public-data.samples.shakespeare`
        GROUP BY title
        ORDER BY unique_words DESC
        LIMIT 10""")

    results = query_job.result()  # Waits for job to complete.

    for row in results:
        print("{}: {}".format(row.title, row.unique_words))

if __name__ == '__main__':
query_shakespeare()C:\Python27>python.exe goo_test_bquerry.py
hamlet: 5318
kinghenryv: 5104
cymbeline: 4875
troilusandcressida: 4795
kinglear: 4784
kingrichardiii: 4713
2kinghenryvi: 4683
coriolanus: 4653
2kinghenryiv: 4605
antonyandcleopatra: 4582Friday, August 18, 2017
The Google Cloud SDK - part 002 .
The next part of my tutorials about the Google Cloud SDK comes with some info about the project.
As you know I used the default sample app engine hello word standard application.
The goal is to understand how it works by working with Google's documentation and examples.
Into this project folder we have this files:
First is app.yaml and come with:
You can have many application-level configuration files (dispatch.yaml, cron.yaml, index.yaml, and queue.yaml).
This all type of configuration files are included in the top level app directory ( in this case: hello_world).
Let's see some common gcloud commands:
First, change the text from main.py file with something else:
You can read about this files into google documentation page - here.
Also some gcloud commands and reference you can read here.
As you know I used the default sample app engine hello word standard application.
The goal is to understand how it works by working with Google's documentation and examples.
Into this project folder we have this files:
08/17/2017  11:12 PM                98 app.yaml
08/17/2017  11:12 PM               854 main.py
08/17/2017 11:12 PM 817 main_test.pyFirst is app.yaml and come with:
runtime: python27
api_version: 1
threadsafe: true

handlers:
- url: /.*
  script: main.app
# Copyright 2016 Google Inc.
#
# Licensed under the Apache License, Version 2.0 (the "License");
# you may not use this file except in compliance with the License.
# You may obtain a copy of the License at
#
#     http://www.apache.org/licenses/LICENSE-2.0
#
# Unless required by applicable law or agreed to in writing, software
# distributed under the License is distributed on an "AS IS" BASIS,
# WITHOUT WARRANTIES OR CONDITIONS OF ANY KIND, either express or implied.
# See the License for the specific language governing permissions and
# limitations under the License.

import webapp2


class MainPage(webapp2.RequestHandler):
    def get(self):
        self.response.headers['Content-Type'] = 'text/plain'
        self.response.write('Hello, World!')


app = webapp2.WSGIApplication([
    ('/', MainPage),
], debug=True)# Copyright 2016 Google Inc. All rights reserved.
#
# Licensed under the Apache License, Version 2.0 (the "License");
# you may not use this file except in compliance with the License.
# You may obtain a copy of the License at
#
# http://www.apache.org/licenses/LICENSE-2.0
#
# Unless required by applicable law or agreed to in writing, software
# distributed under the License is distributed on an "AS IS" BASIS,
# WITHOUT WARRANTIES OR CONDITIONS OF ANY KIND, either express or implied.
# See the License for the specific language governing permissions and
# limitations under the License.
import webtest
import main
def test_get():
app = webtest.TestApp(main.app)
response = app.get('/')
assert response.status_int == 200
assert response.body == 'Hello, World!'
You can have many application-level configuration files (dispatch.yaml, cron.yaml, index.yaml, and queue.yaml).
This all type of configuration files are included in the top level app directory ( in this case: hello_world).
Let's see some common gcloud commands:
- gcloud app deploy --project XXXXXX - deploy your project;
- gcloud app browse - show your project running into your browser;
- gcloud components list - show all available components;
- gcloud components update - update all gcloud components;
- gcloud projects list --limit=10 - show all projects with a limit number;
First, change the text from main.py file with something else:
self.response.write('Hello, World!')C:\Python27\python-docs-samples\appengine\standard\hello_world>gcloud app deploy
C:\Python27\python-docs-samples\appengine\standard\hello_world>gcloud app browseYou can read about this files into google documentation page - here.
Also some gcloud commands and reference you can read here.
Thursday, August 17, 2017
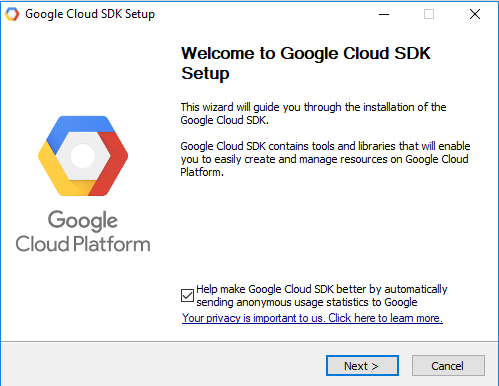
The Google Cloud SDK - part 001 .
This tutorial will cover this steps into development with Google Cloud SDK and Python version 2.7:
First, you need to download the Google Cloud SDK and run it.
After GUI install a window command will ask you to set the default project for your work.

This will start an online tutorial into the right area of the screen with all commands and steps for your Google Cloud SDK online project.
Follow this steps and in the end will see how the online Google Cloud SDK project will show: Hello, World! into your browser.
The next step is to make a local project and run it.
You can use the python docs sample from GoogleCloudPlatform but is not the same with the online example.
To download the GoogleCloudPlatform sample use git command:
- install the Google Cloud SDK on the computer;
- make settings online for your Google project to use Google Cloud SDK;
- run the online project of Google Cloud SDK;
- make setting into your computer to run the local project ;
First, you need to download the Google Cloud SDK and run it.
After GUI install a window command will ask you to set the default project for your work.
Welcome to the Google Cloud SDK! Run "gcloud -h" to get the list of available commands.
---
Welcome! This command will take you through the configuration of gcloud.

Your current configuration has been set to: [default]

You can skip diagnostics next time by using the following flag:
  gcloud init --skip-diagnostics

Network diagnostic detects and fixes local network connection issues.
Checking network connection...done.
Reachability Check passed.
Network diagnostic (1/1 checks) passed.

You must log in to continue. Would you like to log in (Y/n)?  Y
...This will start an online tutorial into the right area of the screen with all commands and steps for your Google Cloud SDK online project.
Follow this steps and in the end will see how the online Google Cloud SDK project will show: Hello, World! into your browser.
The next step is to make a local project and run it.
You can use the python docs sample from GoogleCloudPlatform but is not the same with the online example.
To download the GoogleCloudPlatform sample use git command:
C:\Python27>git clone https://github.com/GoogleCloudPlatform/python-docs-samples
Cloning into 'python-docs-samples'...
remote: Counting objects: 12126, done.
remote: Compressing objects: 100% (16/16), done.
remote: Total 12126 (delta 1), reused 10 (delta 1), pack-reused 12106
Receiving objects: 100% (12126/12126), 3.37 MiB | 359.00 KiB/s, done.
Resolving deltas: 100% (6408/6408), done.

C:\Python27>cd python-docs-samples/appengine/standard/hello_worldC:\Python27\python-docs-samples\appengine\standard\hello_world>gcloud app deploy app.yaml --project encoded-metrics-147522
Services to deploy:
descriptor: [C:\Python27\python-docs-samples\appengine\standard\hello_world\app.yaml]
source: [C:\Python27\python-docs-samples\appengine\standard\hello_world]
target project: [encoded-metrics-147522]
target service: [default]
target version: [20170817t234925]
target url: [https://encoded-metrics-147522.appspot.com]
Do you want to continue (Y/n)? Y
Beginning deployment of service [default]...
#============================================================#
#= Uploading 5 files to Google Cloud Storage =#
#============================================================#
File upload done.
Updating service [default]...done.
Waiting for operation [apps/encoded-metrics-147522/operations/XXXXXX] to complete...done.
Updating service [default]...done.
Deployed service [default] to [https://XXXXXX.appspot.com]
You can stream logs from the command line by running:
$ gcloud app logs tail -s default
To view your application in the web browser run:
$ gcloud app browse
C:\Python27\python-docs-samples\appengine\standard\hello_world>gcloud app browse
Opening [https://XXXXXX.appspot.com] in a new tab in your default browser.
C:\Python27\python-docs-samples\appengine\standard\hello_world>Wednesday, June 28, 2017
The Google API Client Library python module.
This python module named Google API Client Library for Python is a client library for accessing the Plus, Moderator, and many other Google APIs, according to the official link.
The first step for accessing the Google Developer’s Console.
Then navigate to the Developer Console’s projects page and create a new project for our application by clicking the Create project button and then enable blogger API.
Enter your projects name and hit create.
Click the Go to Credentials button with these settings like in the next image:

Download this credential information in JSON format, in this case, is the client_id.json file.
When you run for the first time this script you will see an open HTML page with your auth code.
The script example named google_001.py will come with this message:
Now you can run the example.
C:\Python27\Scripts>pip install --upgrade google-api-python-client
Collecting google-api-python-client
  Downloading google_api_python_client-1.6.2-py2.py3-none-any.whl (52kB)
    100% |################################| 61kB 426kB/s
...
Successfully installed google-api-python-client-1.6.2 ...from oauth2client.client import flow_from_clientsecrets
import httplib2
import apiclient
from apiclient.discovery import build
from oauth2client.file import Storage
import webbrowser
def get_credentials():
scope = 'https://www.googleapis.com/auth/blogger'
flow = flow_from_clientsecrets(
'client_id.json', scope,
redirect_uri='urn:ietf:wg:oauth:2.0:oob')
storage = Storage('credentials.dat')
credentials = storage.get()
if not credentials or credentials.invalid:
auth_uri = flow.step1_get_authorize_url()
webbrowser.open(auth_uri)
auth_code = raw_input('Enter the auth code: ')
credentials = flow.step2_exchange(auth_code)
storage.put(credentials)
return credentials
def get_service():
"""Returns an authorised blogger api service."""
credentials = get_credentials()
http = httplib2.Http()
http = credentials.authorize(http)
service = apiclient.discovery.build('blogger', 'v3', http=http)
return service
if __name__ == '__main__':
served = get_service()
print dir(served.blogs)
users = served.users()
# Retrieve this user's profile information
thisuser = users.get(userId='self').execute()
print('This user\'s display name is: %s' % thisuser['displayName'].encode('utf-8'))
blogs = served.blogs()
# Retrieve the list of Blogs this user has write privileges on
thisusersblogs = blogs.listByUser(userId='self').execute()
for blog in thisusersblogs['items']:
print('The blog named \'%s\' is at: %s' % (blog['name'], blog['url']))
C:\Python27>python.exe google_001.py
['__call__', '__class__', '__cmp__', '__delattr__', '__doc__', '__format__', '__func__',
'__get__', '__getattribute__', '__hash__', '__init__', '__is_resource__', '__new__', '__reduce__', '__reduce_ex__', '__repr__', '__self__', '__setattr__', '__sizeof__', '__str__', '__subclasshook__', 'im_class', 'im_func', 'im_self']
This user's display name is: Cătălin George Feștilă
The blog named 'python-catalin' is at: http://python-catalin.blogspot.com/
The blog named 'graphics' is at: http://graphic-3d.blogspot.com/
The blog named 'About me and my life ...' is at: http://catalin-festila.blogspot.com/
The blog named 'pygame-catalin' is at: http://pygame-catalin.blogspot.com/The first step for accessing the Google Developer’s Console.
Then navigate to the Developer Console’s projects page and create a new project for our application by clicking the Create project button and then enable blogger API.
Enter your projects name and hit create.
Click the Go to Credentials button with these settings like in the next image:
Download this credential information in JSON format, in this case, is the client_id.json file.
When you run for the first time this script you will see an open HTML page with your auth code.
The script example named google_001.py will come with this message:
C:\Python27>python.exe google_001.py
C:\Python27\lib\site-packages\oauth2client\_helpers.py:255: UserWarning: Cannot access credentials.dat: No such file or directory
  warnings.warn(_MISSING_FILE_MESSAGE.format(filename))
Enter the auth code:Now you can run the example.
Sunday, November 6, 2016
Python and OAuth2 with Google API.
If you want to do this then is simple to do. The most complex part comes from google settings.
But that can be easy if you make it from a few times.
I used OAuth2 with JSON file to make authentification.
You can see my full tutorial here.
Friday, December 6, 2013
Start searching with python google module .
You can use python google module to start searching anything using this module.
First you need to install the python module using pip.
# pip install google
Downloading/unpacking google
  Downloading google-1.05.zip
  Running setup.py egg_info for package google

Requirement already satisfied (use --upgrade to upgrade): beautifulsoup4
in /usr/local/lib/python2.7/dist-packages (from google)
Installing collected packages: google
  Running setup.py install for google
    changing mode of build/scripts-2.7/google.py from 644 to 755

    changing mode of /usr/local/bin/google.py to 755
Successfully installed google
Cleaning up...
As you can see the next step is to upgrade: beautifulsoup4 ...
# pip install --upgrade beautifulsoup4
Downloading/unpacking beautifulsoup4 from https://pypi.python.org/packages/
source/b/beautifulsoup4/beautifulsoup4-4.3.2.tar.gz#md5=
b8d157a204d56512a4cc196e53e7d8ee
  Downloading beautifulsoup4-4.3.2.tar.gz (143Kb): 143Kb downloaded
  Running setup.py egg_info for package beautifulsoup4

Installing collected packages: beautifulsoup4
  Found existing installation: beautifulsoup4 4.3.1
    Uninstalling beautifulsoup4:
      Successfully uninstalled beautifulsoup4
  Running setup.py install for beautifulsoup4

Successfully installed beautifulsoup4
Cleaning up...
Let's make a simple script to find linux word using google.com ...
>>> from google import search
>>> for url in search('linux', tld='com', lang='en', stop=2):
...     print(url)
...
http://en.wikipedia.org/wiki/Linux
http://en.wikipedia.org/wiki/Unix-like
http://en.wikipedia.org/wiki/Linus_Torvalds
http://en.wikipedia.org/wiki/Linux_kernel
http://en.wikipedia.org/wiki/List_of_Linux_distributions
...
If you want to know more about google search function then use this:
>>> help(google.search)
Help on function search in module google:

search(query, tld='com', lang='en', num=10, start=0, stop=None, pause=2.0)
    Search the given query string using Google.
...
... and this is all.
Saturday, August 1, 2009
Google and Python Stuff
I want share this scripts.
Is just two scripts and i think is beautifull.
First is a youtube script :
Second is a picassa script :
I hope you like this little scripts.
Is just two scripts and i think is beautifull.
First is a youtube script :
import gdata.youtube
import gdata.youtube.service

client_yt = gdata.youtube.service.YouTubeService()
query = gdata.youtube.service.YouTubeVideoQuery()
query.vs = "%s" % ('News')
feed = client_yt.YouTubeQuery(query)

for entry in feed.entry:
print entry.title.text
for link in entry.link:
if link.rel == 'alternate':
print link.href
Second is a picassa script :
import gdata.photos
import gdata.photos.service
import urllib
p_client = gdata.photos.service.PhotosService()

query_parameters = map(urllib.quote, ['Sexy','Bucharest']);
feed = p_client.GetFeed("/data/feed/api/all?q=%s%s&max-results=10" % ('Sexy','Girl'))

for entry in feed.entry:
print entry.title.text
for link in entry.link:
if link.rel == 'alternate':
print link.href
I hope you like this little scripts.
Subscribe to:
Posts (Atom)