analitics

Pages

Showing posts with label fedora. Show all posts

Tuesday, October 1, 2019

Python 3.7.4 : Install the protobuf from sources on Fedora distro.

Today I will show you how to build protobuf from sources using the Fedora distro.
The google team comes with this intro:
Protocol buffers are Google's language-neutral, platform-neutral, extensible mechanism for serializing structured data – think XML, but smaller, faster, and simpler...
This google project comes with these tutorials.
The GitHub project can be found here.
To install the compiler, download the package.
[mythcat@desk ~]$ cd Downloads/
[mythcat@desk Downloads]$ cp protobuf-python-3.9.2.tar.gz ~/
[mythcat@desk Downloads]$ cd ..
[mythcat@desk ~]$ tar xvzf protobuf-python-3.9.2.tar.gz 
...
protobuf-3.9.2/aclocal.m4
protobuf-3.9.2/install-sh
protobuf-3.9.2/generate_descriptor_proto.sh
protobuf-3.9.2/CHANGES.txt
protobuf-3.9.2/configure.ac
protobuf-3.9.2/configure
Let's see the content:
[mythcat@desk ~]$ cd protobuf-3.9.2/
[mythcat@desk protobuf-3.9.2]$ ls
aclocal.m4                   config.sub                    ltmain.sh            README.md
ar-lib                       configure                     m4                   six.BUILD
autogen.sh                   configure.ac                  Makefile.am          src
benchmarks                   conformance                   Makefile.in          test-driver
BUILD                        CONTRIBUTORS.txt              missing              third_party
CHANGES.txt                  depcomp                       objectivec           update_file_lists.sh
cmake                        editors                       protobuf.bzl         util
compile                      examples                      protobuf_deps.bzl    WORKSPACE
compiler_config_setting.bzl  generate_descriptor_proto.sh  protobuf-lite.pc.in
config.guess                 install-sh                    protobuf.pc.in
config.h.in                  LICENSE                       python
[mythcat@desk protobuf-3.9.2]$ ./configure
...
checking how to run the C preprocessor... gcc -E
checking how to run the C++ preprocessor... /lib/cpp
configure: error: in `/home/mythcat/protobuf-3.9.2':
configure: error: C++ preprocessor "/lib/cpp" fails sanity check
See `config.log' for more details
...
[root@desk protobuf-3.9.2]# dnf install g++
...
Installed:
  gcc-c++-9.2.1-1.fc30.x86_64                                                                               

Complete![root@desk protobuf-3.9.2]# exit
exit
Let's build again:
[mythcat@desk protobuf-3.9.2]$ ./configure
checking whether to enable maintainer-specific portions of Makefiles... yes
checking build system type... x86_64-pc-linux-gnu
...
checking that generated files are newer than configure... done
configure: creating ./config.status
config.status: creating Makefile
config.status: creating scripts/gmock-config
config.status: creating build-aux/config.h
config.status: executing depfiles commands
config.status: executing libtool commands
[mythcat@desk protobuf-3.9.2]$ nproc --all
2
[mythcat@desk protobuf-3.9.2]$ make -j2
...
  CXXLD    protoc
make[2]: Leaving directory '/home/mythcat/protobuf-3.9.2/src'
make[1]: Leaving directory '/home/mythcat/protobuf-3.9.2'
[mythcat@desk protobuf-3.9.2]$ make check -j2
...PASS: protobuf-lazy-descriptor-test
PASS: protobuf-lite-test
PASS: google/protobuf/compiler/zip_output_unittest.sh
PASS: google/protobuf/io/gzip_stream_unittest.sh
PASS: protobuf-lite-arena-test
PASS: no-warning-test
PASS: protobuf-test
============================================================================
Testsuite summary for Protocol Buffers 3.9.2
============================================================================
# TOTAL: 7
# PASS:  7
# SKIP:  0
# XFAIL: 0
# FAIL:  0
# XPASS: 0
# ERROR: 0
============================================================================
make[3]: Leaving directory '/home/mythcat/protobuf-3.9.2/src'
make[2]: Leaving directory '/home/mythcat/protobuf-3.9.2/src'
make[1]: Leaving directory '/home/mythcat/protobuf-3.9.2/src'
The last steps is for install:
[mythcat@desk protobuf-3.9.2]$ sudo make install
[sudo] password for mythcat: 
...
make[2]: Leaving directory '/home/mythcat/protobuf-3.9.2/src'
make[1]: Leaving directory '/home/mythcat/protobuf-3.9.2/src'
[mythcat@desk protobuf-3.9.2]$ sudo ldconfig 
Let's test it:
[mythcat@desk protobuf-3.9.2]$ protoc --version
libprotoc 3.9.2
Now the next step comes for python module:
[mythcat@desk protobuf-3.9.2]$ cd python/
[mythcat@desk python]$ ls
google  MANIFEST.in  mox.py  README.md  release  release.sh  setup.cfg  setup.py  stubout.py  tox.ini
[mythcat@desk python]$ python setup.py build
...
testSerialize (google.protobuf.internal.unknown_fields_test.UnknownFieldsTest) ... ok
testSerializeMessageSetWireFormatUnknownExtension 
(google.protobuf.internal.unknown_fields_test.UnknownFieldsTest) ... ok
testSerializeProto3 (google.protobuf.internal.unknown_fields_test.UnknownFieldsTest) ... ok
testByteSizeFunctions (google.protobuf.internal.wire_format_test.WireFormatTest) ... ok
testPackTag (google.protobuf.internal.wire_format_test.WireFormatTest) ... ok
testUnpackTag (google.protobuf.internal.wire_format_test.WireFormatTest) ... ok
testZigZagDecode (google.protobuf.internal.wire_format_test.WireFormatTest) ... ok
testZigZagEncode (google.protobuf.internal.wire_format_test.WireFormatTest) ... ok

----------------------------------------------------------------------
Ran 818 tests in 5.343s

OK (skipped=10)
Let's test the python module:
[mythcat@desk python]$ python3
Python 3.7.4 (default, Jul  9 2019, 16:32:37) 
[GCC 9.1.1 20190503 (Red Hat 9.1.1-1)] on linux
Type "help", "copyright", "credits" or "license" for more information.
>>> import google
>>> from google.protobuf import descriptor as _descriptor
>>> from google.protobuf import message as _message
>>> from google.protobuf import reflection as _reflection
>>> from google.protobuf import symbol_database as _symbol_database
>>> from google.protobuf import descriptor_pb2
>>> from google.protobuf import text_format
>>> dir(_descriptor)
['Descriptor', 'DescriptorBase', 'DescriptorMetaclass', 'EnumDescriptor', 'EnumValueDescriptor', 
'Error', 'FieldDescriptor', 'FileDescriptor', 'MakeDescriptor', 'MethodDescriptor', 'OneofDescriptor', 
'ServiceDescriptor', 'TypeTransformationError', '_Lock', '_NestedDescriptorBase', '_OptionsOrNone', 
'_ParseOptions', '_ToCamelCase', '_ToJsonName', '_USE_C_DESCRIPTORS', '__author__', '__builtins__', 
'__cached__', '__doc__', '__file__', '__loader__', '__name__', '__package__', '__spec__', '_lock', 
'api_implementation', 'six', 'threading']
Now I can to define the structure for the data structured as messages
These message is a small logical record of information containing a series of name-value pairs called fields.
The protobuffers compiler (protoc) to generate the source code in the language you need (from the .proto file).
To generate a Python file, you need to execute:
protoc -I=$SRC_DIR --python_out=$DST_DIR $SRC_DIR/my_example.proto
Let's test with am example (you can use any proto file) in default folder (use . for default folder):
[mythcat@desk python]$ protoc -I=. --python_out=. my_example.proto
[mythcat@desk python]$ ls my_example*
my_example_pb2.py  my_example.proto
[mythcat@desk python]$ python3
Python 3.7.4 (default, Jul  9 2019, 16:32:37) 
[GCC 9.1.1 20190503 (Red Hat 9.1.1-1)] on linux
Type "help", "copyright", "credits" or "license" for more information.
>>> import my_example_pb2
>>> dir(my_example_pb2)
['AddressBook', 'DESCRIPTOR', 'Person', '_ADDRESSBOOK', '_PERSON', '_PERSON_PHONENUMBER', '_PERSON_PHONETYPE',
 '__builtins__', '__cached__', '__doc__', '__file__', '__loader__', '__name__', '__package__', '__spec__',
 '_b', '_descriptor', '_message', '_reflection', '_sym_db', '_symbol_database', 'sys']
Monday, September 9, 2019

Python 3.7.3 : Using the flask - part 018.

In this tutorial, I will show you how to fix auto increment in Flask SQLAlchemy.
The old source code for the user model from the server.py was this:
class User(db.Model):
    id = db.Column(db.Integer, primary_key=True)
    username = db.Column(db.String(80), unique=True)
    password = db.Column(db.String(120), unique=True)
    email = db.Column(db.String(120), unique=True)
    gender = db.Column(db.String(5), unique=True)
    work = db.Column(db.String(33), unique=True)
    city = db.Column(db.String(15), unique=True)
The server.sqlite will be this:
[mythcat@desk my_flask]$ sqlite3 server.sqlite 
SQLite version 3.26.0 2018-12-01 12:34:55
Enter ".help" for usage hints.
sqlite> .schema
CREATE TABLE user (
 id INTEGER NOT NULL, 
 username VARCHAR(80), 
 password VARCHAR(120), 
 email VARCHAR(120), 
 gender VARCHAR(5), 
 work VARCHAR(33), 
 city VARCHAR(15), 
 PRIMARY KEY (id), 
 UNIQUE (username), 
 UNIQUE (password), 
 UNIQUE (email), 
 UNIQUE (gender), 
 UNIQUE (work), 
 UNIQUE (city)
);
CREATE TABLE alembic_version (
 version_num VARCHAR(32) NOT NULL, 
 CONSTRAINT alembic_version_pkc PRIMARY KEY (version_num)
);
CREATE TABLE sqlite_stat1(tbl,idx,stat);
sqlite> ^Z 
If you want to change the id into auto increment then you need to follow this steps:
class User(db.Model):
    __tablename__ = 'user'
    __table_args__ = {'sqlite_autoincrement': True}
    id = db.Column(db.Integer, primary_key=True)
    username = db.Column(db.String(80), unique=True)
    password = db.Column(db.String(120), unique=True)
    email = db.Column(db.String(120), unique=True)
    gender = db.Column(db.String(5), unique=True)
    work = db.Column(db.String(33), unique=True)
    city = db.Column(db.String(15), unique=True)
Delete the server.sqlite file or rename it.
Open python3 and create a new server.sqlite file:
[mythcat@desk my_flask]$ python3
Python 3.7.4 (default, Jul  9 2019, 16:32:37) 
[GCC 9.1.1 20190503 (Red Hat 9.1.1-1)] on linux
Type "help", "copyright", "credits" or "license" for more information.
>>> from server import db
>>> db.create_all()
>>> db.engine.table_names()
['sqlite_sequence', 'user']
>>> 
[5]+  Stopat                  python3 
Open the new file to see the changes:
[mythcat@desk my_flask]$ sqlite3 server.sqlite 
SQLite version 3.26.0 2018-12-01 12:34:55
Enter ".help" for usage hints.
sqlite> .schema
CREATE TABLE user (
 id INTEGER NOT NULL PRIMARY KEY AUTOINCREMENT, 
 username VARCHAR(80), 
 password VARCHAR(120), 
 email VARCHAR(120), 
 gender VARCHAR(5), 
 work VARCHAR(33), 
 city VARCHAR(15), 
 UNIQUE (username), 
 UNIQUE (password), 
 UNIQUE (email), 
 UNIQUE (gender), 
 UNIQUE (work), 
 UNIQUE (city)
);
CREATE TABLE sqlite_sequence(name,seq);
sqlite>  

Wednesday, September 4, 2019

Python 3.7.4 : Create an Stand Alone Executable on Fedora distro.

In this tutorial I will show you how to create an Stand Alone Executable with Python version 3.7.4 and Fedora 30 distro.
First you need to install using the dnf tool the python3 package.
You can test it easy with this command:
[mythcat@desk dist]$ python3
Python 3.7.4 (default, Jul  9 2019, 16:32:37) 
[GCC 9.1.1 20190503 (Red Hat 9.1.1-1)] on linux
Type "help", "copyright", "credits" or "license" for more information. 
I created a simple python script named test.py for testing:
import os
import sys
print("Hello!")
You need to install the pyinstaller python module.
Let's see this step with the output:
[mythcat@desk ~]$ pip3 install pyinstaller --user
Now you can use this python module to create Stand Alone Executable.
[mythcat@desk ~]$ pip3 install pyinstaller --user
Requirement already satisfied: pyinstaller in ./.local/lib/python3.7/site-packages (3.5)
Requirement already satisfied: setuptools in /usr/lib/python3.7/site-packages (from pyinstaller) (40.8.0)
Requirement already satisfied: altgraph in ./.local/lib/python3.7/site-packages (from pyinstaller) (0.16.1)
[mythcat@desk ~]$ pyinstaller --onefile test.py
561 INFO: PyInstaller: 3.5
561 INFO: Python: 3.7.4
571 INFO: Platform: Linux-5.2.9-200.fc30.x86_64-x86_64-with-fedora-30-Thirty
573 INFO: wrote /home/mythcat/test.spec
596 INFO: UPX is not available.
598 INFO: Extending PYTHONPATH with paths
['/home/mythcat', '/home/mythcat']
598 INFO: checking Analysis
624 INFO: Building because /home/mythcat/test.py changed
624 INFO: Initializing module dependency graph...
640 INFO: Initializing module graph hooks...
678 INFO: Analyzing base_library.zip ...
5247 INFO: running Analysis Analysis-00.toc
5352 INFO: Caching module hooks...
5376 INFO: Analyzing /home/mythcat/test.py
5396 INFO: Loading module hooks...
5397 INFO: Loading module hook "hook-xml.py"...
5775 INFO: Loading module hook "hook-pydoc.py"...
5800 INFO: Loading module hook "hook-encodings.py"...
5892 INFO: Looking for ctypes DLLs
5893 INFO: Analyzing run-time hooks ...
5901 INFO: Looking for dynamic libraries
6507 INFO: Looking for eggs
6507 INFO: Using Python library /lib64/libpython3.7m.so.1.0
6514 INFO: Warnings written to /home/mythcat/build/test/warn-test.txt
6547 INFO: Graph cross-reference written to /home/mythcat/build/test/xref-test.html
6604 INFO: checking PYZ
6607 INFO: Building because toc changed
6607 INFO: Building PYZ (ZlibArchive) /home/mythcat/build/test/PYZ-00.pyz
7030 INFO: Building PYZ (ZlibArchive) /home/mythcat/build/test/PYZ-00.pyz completed successfully.
7034 INFO: checking PKG
7035 INFO: Building because toc changed
7035 INFO: Building PKG (CArchive) PKG-00.pkg
10033 INFO: Building PKG (CArchive) PKG-00.pkg completed successfully.
10036 INFO: Bootloader 
/home/mythcat/.local/lib/python3.7/site-packages/PyInstaller/bootloader/Linux-64bit/run
10036 INFO: checking EXE
10123 INFO: Building because toc changed
10124 INFO: Building EXE from EXE-00.toc
10163 INFO: Appending archive to ELF section in EXE /home/mythcat/dist/test
10337 INFO: Building EXE from EXE-00.toc completed successfully.
This command will create some folders: dist, build, ...
The dist folder will have the Stand Alone Executable named test:
[mythcat@desk ~]$ cd dist/
[mythcat@desk dist]$ ls
test
[mythcat@desk dist]$ ./test
Hello!

Saturday, March 30, 2019

Testing the python IMDbPY module with simple commands.

Today we tested a more innovative but useful method with python aaa mode.
The main reason I used this method is the lack of documentation.
Using this method, we have reached elements related to the use of reported methods and errors.
The test was done on a Fedora 29 Linux system with a classic install with the pip utility:
[mythcat@desk ~]$ pip install imdbpy --user
Collecting imdbpy
...
Successfully installed SQLAlchemy-1.3.1 imdbpy-6.6 
I used an example of a person's search in the IMDB database to test this method.
>>> from imdb import IMDb, IMDbError
>>> try:
...     im=IMDb()
...     people = im.search_person('Mel Gibson')
... except IMDbError as exc:
...     print(exc) 
Using the dir and print function will show the resulting output configuration and will have the following form:
>>> print(people)
[, , , , , , , , , , , , , , , , , , , ] 
I have used the dir function for a relative view of the options we have:
>>> print(dir(people))
['__add__', '__class__', '__contains__', '__delattr__', '__delitem__', '__delslice__', '__doc__', 
'__eq__', '__format__', '__ge__', '__getattribute__', '__getitem__', '__getslice__', 
'__gt__', '__hash__', '__iadd__', '__imul__', '__init__', '__iter__', '__le__', '__len__', 
'__lt__', '__mul__', '__ne__', '__new__', '__reduce__', '__reduce_ex__', '__repr__', '__reversed__', 
'__rmul__', '__setattr__', '__setitem__', '__setslice__', '__sizeof__', '__str__', '__subclasshook__', 
'append', 'count', 'extend', 'index', 'insert', 'pop', 'remove', 'reverse', 'sort']
>>> print(dir(people[0]))
['_Container__role', '__bool__', '__class__', '__contains__', '__deepcopy__', '__delattr__', 
'__delitem__', '__dict__', '__doc__', '__eq__', '__format__', '__ge__', '__getattribute__', 
'__getitem__', '__gt__', '__hash__', '__init__', '__le__', '__len__', '__lt__', '__module__', 
'__ne__', '__new__', '__reduce__', '__reduce_ex__', '__repr__', '__setattr__', '__setitem__', 
'__sizeof__', '__str__', '__subclasshook__', '__weakref__', '_additional_keys', '_clear', 
'_get_currentRole', '_get_roleID', '_getitem', '_image_key', '_init', '_reset', '_roleClass', 
'_roleIsPerson', '_set_currentRole', '_set_roleID', 'accessSystem', 'add_to_current_info', 
'append_item', 'asXML', 'billingPos', 'charactersRefs', 'clear', 'cmpFunct', 'copy', 'currentRole', 
'current_info', 'data', 'default_info', 'get', 'getAsXML', 'getID', 'get_charactersRefs', 
'get_current_info', 'get_fullsizeURL', 'get_namesRefs', 'get_titlesRefs', 'has_current_info', 
'has_key', 'infoset2keys', 'isSame', 'isSameName', 'isSamePerson', 'items', 'iteritems', 
'iterkeys', 'itervalues', 'key2infoset', 'keys', 'keys_alias', 'keys_tomodify', 'keys_tomodify_list', 
'modFunct', 'myID', 'myName', 'namesRefs', 'notes', 'personID', 'pop', 'popitem', 'reset', 'roleID', 
'set_current_info', 'set_data', 'set_item', 'set_mod_funct', 'set_name', 'setdefault', 'summary', 
'titlesRefs', 'update', 'update_charactersRefs', 'update_infoset_map', 'update_namesRefs', 
'update_titlesRefs', 'values']
Here are some simple examples of displaying using the print function to view content in output:

>>> print(people[0].values())
[u'Catalin', u'II', u'Catalin', u'Catalin (II)', u'Catalin (II)']
>>> print(people[0].data)
{u'name': u'Catalin', u'imdbIndex': u'II'}
>>> print(people[1].data.viewitems())
dict_items([(u'name', u'Moreno, Catalina Sandino')])
>>> print(people[1].data.values())
[u'Moreno, Catalina Sandino']
>>> print(people[0].getID())
2165704
>>> print(people[0].itervalues())
The built-in function iter takes an iterable object and returns an iterator.
>>> print(people[0].itervalues().next())
Catalin
>>> print(people[0].asXML()) 
The last line of code will return XML content.
This simple example simply illustrates how to access structured information through simple Python commands.

Friday, May 5, 2017

The google-cloud-vision python module - part 001.

Google comes with $300 credit for free to sign up into Google Cloud Platform over the next 12 months.
This allows you to deal with access to all Cloud Platform Products.
Today I will show you how to install this platform into your Linux and Windows 10 OS.
For Linux, I used Fedora 26 distro.
Using the Windows 10 operating system and python 2.7 then you can use this command:
pip install --upgrade google-cloud-vision
If you got errors the fix with this command:
C:\Python27\Scripts>pip install --upgrade  --trusted-host  pypi.python.org google-cloud-vision
Collecting google-cloud-vision
  Downloading google_cloud_vision-0.24.0-py2.py3-none-any.whl (68kB)
    100% |################################| 71kB 270kB/s
Collecting google-cloud-core<0 .25dev="">=0.24.0 (from google-cloud-vision)
  Downloading google_cloud_core-0.24.1-py2.py3-none-any.whl (52kB)
    100% |################################| 61kB 1.6MB/s
...
Installing collected packages: appdirs, setuptools, protobuf, httplib2, rsa, pyasn1-modules,
 cachetools, google-auth, google-auth-httplib2, googleapis-common-protos, google-cloud-core,
 pyreadline, dill, futures, grpcio, oauth2client, ply, google-gax, proto-google-cloud-vision-v1,
 gapic-google-cloud-vision-v1, google-cloud-vision, pyparsing
  Found existing installation: appdirs 1.4.0
    Uninstalling appdirs-1.4.0:
      Successfully uninstalled appdirs-1.4.0
  Rolling back uninstall of appdirs
Exception:
Traceback (most recent call last):
  File "c:\python27\lib\site-packages\pip\basecommand.py", line 215, in main
    status = self.run(options, args)
...
    with open(path, 'rb') as stream:
IOError: [Errno 2] No such file or directory: 'c:\\python27\\lib\\site-packages\\
appdirs-1.4.0.dist-info\\METADATA'
I run again the command and I don't have errors:
C:\Python27\Scripts>pip install --upgrade  --trusted-host  pypi.python.org google-cloud-vision
Collecting google-cloud-vision
  Downloading google_cloud_vision-0.24.0-py2.py3-none-any.whl (68kB)
    100% |################################| 71kB 597kB/s
Collecting google-cloud-core<0 .25dev="">=0.24.0 (from google-cloud-vision)
...
  Downloading futures-3.1.1-py2-none-any.whl
Collecting pyparsing (from packaging>=16.8->setuptools->protobuf>=3.0.0->google-cloud-core<0 .25dev="">=0.24.0->google-cloud-vision)
  Downloading pyparsing-2.2.0-py2.py3-none-any.whl (56kB)
    100% |################################| 61kB 4.7MB/s
Installing collected packages: appdirs, setuptools, protobuf, httplib2, rsa, pyasn1-modules,
 cachetools, google-auth, google-auth-httplib2, googleapis-common-protos, google-cloud-core,
 oauth2client, ply, pyreadline, dill, futures, grpcio, google-gax, proto-google-cloud-vision-v1,
 gapic-google-cloud-vision-v1, google-cloud-vision, pyparsing
  Found existing installation: appdirs 1.4.0
    Uninstalling appdirs-1.4.0:
      Successfully uninstalled appdirs-1.4.0
  Found existing installation: setuptools 34.0.2
    Uninstalling setuptools-34.0.2:
      Successfully uninstalled setuptools-34.0.2
  Found existing installation: httplib2 0.9.2
    Uninstalling httplib2-0.9.2:
      Successfully uninstalled httplib2-0.9.2
  Found existing installation: pyparsing 2.1.10
    Uninstalling pyparsing-2.1.10:
      Successfully uninstalled pyparsing-2.1.10
Successfully installed appdirs-1.4.3 cachetools-2.0.0 dill-0.2.6 futures-3.1.1 
gapic-google-cloud-vision-v1-0.90.3 google-auth-1.0.0 google-auth-httplib2-0.0.2 
google-cloud-core-0.24.1 google-cloud-vision-0.24.0 google-gax-0.15.8 googleapis-common-protos-1.5.2
 grpcio-1.3.0 httplib2-0.10.3 oauth2client-3.0.0 ply-3.8 proto-google-cloud-vision-v1-0.90.3
 protobuf-3.2.0 pyasn1-modules-0.0.8 pyparsing-2.2.0 pyreadline-2.1 rsa-3.4.2 setuptools-35.0.2
For Fedora 26 distro I used this command to install the python module:
[root@localhost mythcat]# pip install --upgrade google-cloud-vision --ignore-installed
WARNING: Running pip install with root privileges is generally not a good idea. 
Try `pip install --user` instead.                                         
Collecting google-cloud-vision
  Using cached google_cloud_vision-0.24.0-py2.py3-none-any.whl
...
 google-auth-httplib2, google-cloud-core, google-cloud-vision
  Running setup.py install for dill ... done
  Running setup.py install for future ... done
  Running setup.py install for googleapis-common-protos ... done
  Running setup.py install for ply ... done
  Running setup.py install for google-gax ... done
  Running setup.py install for httplib2 ... done
  Running setup.py install for oauth2client ... done
  Running setup.py install for proto-google-cloud-vision-v1 ... done
  Running setup.py install for gapic-google-cloud-vision-v1 ... done
Successfully installed appdirs-1.4.3 cachetools-2.0.0 dill-0.2.6 enum34-1.1.6 
future-0.16.0 futures-3.1.1 gapic-google-cloud-vision-v1-0.90.3 google-auth-1.0.0
 google-auth-httplib2-0.0.2 google-cloud-core-0.24.1 google-cloud-vision-0.24.0
 google-gax-0.15.9 googleapis-common-protos-1.5.2 grpcio-1.3.0 httplib2-0.10.3
 oauth2client-3.0.0 packaging-16.8 ply-3.8 proto-google-cloud-vision-v1-0.90.3
 protobuf-3.2.0 pyasn1-0.2.3 pyasn1-modules-0.0.8 pyparsing-2.2.0 rsa-3.4.2 
setuptools-35.0.2 six-1.10.0


Wednesday, April 5, 2017

The scapy python module - part 001.

Today I will start with scapy python module.
This is a good python module to deal and interact with network packets.
[root@localhost mythcat]# pip install scapy
Collecting scapy
  Downloading scapy-2.3.3.tgz (1.4MB)
    100% |████████████████████████████████| 1.4MB 904kB/s 
Building wheels for collected packages: scapy
  Running setup.py bdist_wheel for scapy ... done
  Stored in directory: /root/.cache/pip/wheels/bd/cf/...
Installing collected packages: scapy
Successfully installed scapy-2.3.3
The first test is to test is the echo of Layer 3 ICMP.
Use the superuser shell to run this python script:
from scapy.all import *
dstip=raw_input("enter the ip address \n")
icmp=ICMP()
icmp.type=8
icmp.code=0
ip=IP()
ip.dst=dstip
p=sr1(ip/icmp,timeout=5, verbose=0)
if(p):
        print "Layer 3 is up"
else:
        print "Layer 3 status is down"
The next python script will about arp request:
from scapy.all import *
def arp_display(pkt):
    if pkt[ARP].op == 1: 
        return "Request: " + pkt[ARP].psrc + " is asking about " + pkt[ARP].pdst
    if pkt[ARP].op == 2: 
        return "*Response: " + pkt[ARP].hwsrc + " has address " + pkt[ARP].psrc
print sniff(prn=arp_display, filter="arp", store=0, count=10)
This will read the packages from source and destination and show me what ARP traffic my computer is seeing.

Saturday, March 4, 2017

Working with datetime python module.

This module is very good and I worked with this issue by using MySQL and python.
The version of python I used is 2.7 under Fedora distro.
You can take a look at the official page.
I use the pip and not the DNF fedora Linux tool.
 
[root@localhost lucru]# pip install datetime
Collecting datetime
Downloading DateTime-4.1.1.zip (66kB)
100% |████████████████████████████████| 71kB 703kB/s 
Collecting zope.interface (from datetime)
Downloading zope.interface-4.3.3.tar.gz (150kB)
100% |████████████████████████████████| 153kB 2.2MB/s 
Collecting pytz (from datetime)
Downloading pytz-2016.10-py2.py3-none-any.whl (483kB)
100% |████████████████████████████████| 491kB 2.4MB/s 
Requirement already satisfied: setuptools in /usr/lib/python2.7/site-packages (from zope.interface->datetime)
Installing collected packages: zope.interface, pytz, datetime
Running setup.py install for zope.interface ... done
Running setup.py install for datetime ... done
Successfully installed datetime-4.1.1 pytz-2016.10 zope.interface-4.3.3

I solve this problem:
  • conversion using the lambda function
    parser.add_argument('date', type=lambda s: datetime.datetime.strptime(s, '%Y-%m-%d'))
  • solve last day
    datetime.datetime.strptime(new_value, '%Y-%m-%d %H:%M:%S')-timedelta(days=1)
  • print the today date
    print date.today()
  • show date using an explicit format string
    today=date.today()
    today.strftime("%A %d. %B %Y")
    'Sunday 05. March 2017'
    
  • using epoch issue [1]
    from datetime import datetime
    now_epoch = (datetime.utcnow() - datetime(1970, 1, 1)).total_seconds()
    datetime.utcfromtimestamp(now_epoch)
    datetime.datetime(2017, 3, 4, 22, 35, 13, 463409)
    datetime.fromtimestamp(now_epoch)
    datetime.datetime(2017, 3, 5, 0, 35, 13, 463409)
    import pytz
    datetime.fromtimestamp(now_epoch, pytz.utc)
    datetime.datetime(2017, 3, 4, 22, 35, 13, 463409, tzinfo=)
    
[1] The Unix epoch is the time 00:00:00 UTC on 1 January 1970. There is a problem with this definition, in that UTC did not exist in its current form until 1972;

Using pygeoip and maxmin database.


I try to locate one IP using the databases from maxmind website and is not good for me.
The database records show me the output from country area.
I read the docs from here.
This is the python script I used:
#wget -N -q http://geolite.maxmind.com/download/geoip/database/GeoLiteCity.dat.gz
import pygeoip 
gip = pygeoip.GeoIP('GeoLiteCity.dat')
rec = gip.record_by_addr('___________________')
for key,val in rec.items():
    print "%s: %s" %(key,val)

Saturday, February 25, 2017

Linux: OpenCV and using Lucas-Kanade Optical Flow function.

Fist I install OpenCV python module and I try using with Fedora 25.
I used python 2.7 version.
[root@localhost mythcat]# dnf install opencv-python.x86_64 
Last metadata expiration check: 0:21:12 ago on Sat Feb 25 23:26:59 2017.
Dependencies resolved.
================================================================================
 Package              Arch          Version                Repository      Size
================================================================================
Installing:
 opencv               x86_64        3.1.0-8.fc25           fedora         1.8 M
 opencv-python        x86_64        3.1.0-8.fc25           fedora         376 k
 python2-nose         noarch        1.3.7-11.fc25          updates        266 k
 python2-numpy        x86_64        1:1.11.2-1.fc25        fedora         3.2 M

Transaction Summary
================================================================================
Install  4 Packages

Total download size: 5.6 M
Installed size: 29 M
Is this ok [y/N]: y
Downloading Packages:
(1/4): opencv-python-3.1.0-8.fc25.x86_64.rpm    855 kB/s | 376 kB     00:00    
(2/4): opencv-3.1.0-8.fc25.x86_64.rpm           1.9 MB/s | 1.8 MB     00:00    
(3/4): python2-nose-1.3.7-11.fc25.noarch.rpm    543 kB/s | 266 kB     00:00    
(4/4): python2-numpy-1.11.2-1.fc25.x86_64.rpm   2.8 MB/s | 3.2 MB     00:01    
--------------------------------------------------------------------------------
Total                                           1.8 MB/s | 5.6 MB     00:03     
Running transaction check
Transaction check succeeded.
Running transaction test
Transaction test succeeded.
Running transaction
  Installing  : python2-nose-1.3.7-11.fc25.noarch                           1/4 
  Installing  : python2-numpy-1:1.11.2-1.fc25.x86_64                        2/4 
  Installing  : opencv-3.1.0-8.fc25.x86_64                                  3/4 
  Installing  : opencv-python-3.1.0-8.fc25.x86_64                           4/4 
  Verifying   : opencv-python-3.1.0-8.fc25.x86_64                           1/4 
  Verifying   : opencv-3.1.0-8.fc25.x86_64                                  2/4 
  Verifying   : python2-numpy-1:1.11.2-1.fc25.x86_64                        3/4 
  Verifying   : python2-nose-1.3.7-11.fc25.noarch                           4/4 

Installed:
  opencv.x86_64 3.1.0-8.fc25            opencv-python.x86_64 3.1.0-8.fc25       
  python2-nose.noarch 1.3.7-11.fc25     python2-numpy.x86_64 1:1.11.2-1.fc25    

Complete!
[root@localhost mythcat]# 
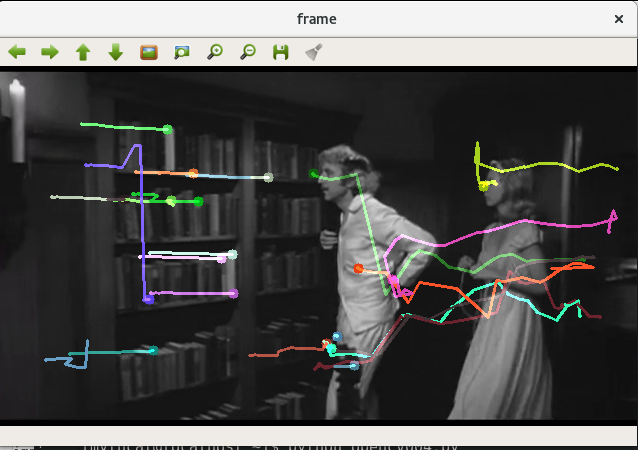
This is my test script with opencv to detect flow using Lucas-Kanade Optical Flow function.
This tracks some points in a black and white video.
First you need:
- one black and white video;
- not mp4 file type file;
- the color args need to be under 4 ( see is 3);
- I used this video:
I used cv2.goodFeaturesToTrack().
We take the first frame, detect some Shi-Tomasi corner points in it, then we iteratively track those points using Lucas-Kanade optical flow.
The function cv2.calcOpticalFlowPyrLK() we pass the previous frame, previous points and next frame.
The returns next points along with some status numbers which has a value of 1 if next point is found, else zero.
That iteratively pass these next points as previous points in next step.
See the code below:
import numpy as np
import cv2

cap = cv2.VideoCapture('candle')

# params for ShiTomasi corner detection
feature_params = dict( maxCorners = 77,
                       qualityLevel = 0.3,
                       minDistance = 7,
                       blockSize = 7 )

# Parameters for lucas kanade optical flow
lk_params = dict( winSize  = (17,17),
                  maxLevel = 1,
                  criteria = (cv2.TERM_CRITERIA_EPS | cv2.TERM_CRITERIA_COUNT, 10, 0.03))

# Create some random colors
color = np.random.randint(0,255,(100,3))

# Take first frame and find corners in it
ret, old_frame = cap.read()
old_gray = cv2.cvtColor(old_frame, cv2.COLOR_BGR2GRAY)
p0 = cv2.goodFeaturesToTrack(old_gray, mask = None, **feature_params)

# Create a mask image for drawing purposes
mask = np.zeros_like(old_frame)

while(1):
    ret,frame = cap.read()
    frame_gray = cv2.cvtColor(frame, cv2.COLOR_BGR2GRAY)

    # calculate optical flow
    p1, st, err = cv2.calcOpticalFlowPyrLK(old_gray, frame_gray, p0, None, **lk_params)

    # Select good points
    good_new = p1[st==1]
    good_old = p0[st==1]

    # draw the tracks
    for i,(new,old) in enumerate(zip(good_new,good_old)):
        a,b = new.ravel()
        c,d = old.ravel()
        mask = cv2.line(mask, (a,b),(c,d), color[i].tolist(), 2)
        frame = cv2.circle(frame,(a,b),5,color[i].tolist(),-1)
    img = cv2.add(frame,mask)

    cv2.imshow('frame',img)
    k = cv2.waitKey(30) & 0xff
    if k == 27:
        break

    # Now update the previous frame and previous points
    old_gray = frame_gray.copy()
    p0 = good_new.reshape(-1,1,2)

cv2.destroyAllWindows()
cap.release()
The output of this file is:

Monday, June 25, 2012

Access system version information using python platform module.

The platform module includes the tools to take some infos about operating system, and hardware platform where a program is running.

import platform
dir(platform)

Show all about this module.

Also you can use the help.

help(platform)

Let's try another

print platform.win32_ver()
('', '', '', '')

So is not Windosw OS.

print platform.system()
Linux

Can be 'Linux', 'Windows' or 'Java' ...

print platform.version()

Show you the system's release version ( can be Debian , Ubuntu , Fedora ).

print platform.architecture()
('32bit', 'ELF')
print platform.uname()

Show the infos like uname linux command.

print platform.release()

Show the kernel use by system.

print platform.machine()
i686
print platform.node()

Show the computer's network name.

print platform.linux_distribution()

Show you the linux distribution.

Monday, March 1, 2010

Python and OpenGL - first steps

First you need to install python .
Second you need to install pyopengl module.
This is easy if we use some linux distributions.
On Fedora we can use command yum.
On Debian and Ubuntu we can use apt-get.
At last we need some basicaly examples.
We can get some examples from:PyOpenGL-Demo
But this is not all we will need more.
To go on next step we will need to read OpenGL specifications.
Try to use search on internet to see more about OpenGL.