analitics

Pages

Showing posts with label django. Show all posts

Monday, December 23, 2019

Python 3.7.5 : About Django REST framework.

First, let's activate my Python virtual environment:
[mythcat@desk django]$ source env/bin/activate
I update my django version 3.0 up to 3.0.1.
(env) [mythcat@desk django]$ pip3 install --upgrade django --user
Collecting django
...
      Successfully uninstalled Django-3.0
Successfully installed django-3.0.1
The next step comes with installation of Python modules for Django and Django REST:
(env) [mythcat@desk django]$ pip3 install djangorestframework --user
Collecting djangorestframework
...
Installing collected packages: djangorestframework
Successfully installed djangorestframework-3.11.0
Into my folder mysite I run this commands
(env) [mythcat@desk django]$ cd mysite/
(env) [mythcat@desk mysite]$ python3 manage.py makemigrations
No changes detected
(env) [mythcat@desk mysite]$ python3 manage.py migrate
Operations to perform:
  Apply all migrations: admin, auth, contenttypes, sessions, test001
Running migrations:
  No migrations to apply.
To pass information over to an HTTP GET request, the information object must be translated into valid response data.
The Django implements serializers for this.
Serializers provide deserialization, allowing parsed data to be converted back into complex types and allow complex data such as querysets and model instances to be converted to native Python datatypes that can then be easily rendered into JSON, XML or other content types.
Let's create the mysite/serializers.py:
(env) [mythcat@desk mysite]$ cd mysite/
(env) [mythcat@desk mysite]$ vim serializers.py 
The code for this python script is this:
from django.contrib.auth.models import User, Group
from rest_framework import serializers

class UserSerializer(serializers.HyperlinkedModelSerializer):
    class Meta:
        model = User
        fields = ['url', 'username', 'email', 'groups']

class GroupSerializer(serializers.HyperlinkedModelSerializer):
    class Meta:
        model = Group
        fields = ['url', 'name']
The next changes will be on urls.py and views.py.
My urls.py file from the Django-chart project is this:
from django.contrib import admin
from django.urls import path
from test001.views import home_page
from test001.views import Test001ChartView
#
from django.urls import include, path
from rest_framework import routers
from test001 import views

router = routers.DefaultRouter()
router.register(r'users', views.UserViewSet)
router.register(r'groups', views.GroupViewSet)

app_name = 'test001'
urlpatterns = [
    path('admin/', admin.site.urls),
    #path('', home_page, name ='home'),
    path('', Test001ChartView.as_view(), name = 'home'), 
    # Use automatic URL routing
    # Can also include login URLs for the browsable API
    path('', include(router.urls)),
    path('api-auth/', include('rest_framework.urls', namespace='rest_framework'))
]
My views.py file is this:
from django.http import HttpResponse
from django.shortcuts import render
# snippet 
from django.shortcuts import get_object_or_404
# for chart 
from django.views.generic import TemplateView
from .models import Test001, Snippet
#
#def home_page(request):
#    return HttpResponse('Home page!')

# django framework
from django.contrib.auth.models import User, Group
from rest_framework import viewsets
from mysite.serializers import UserSerializer, GroupSerializer

def home_page(request):
    return render(request, 'test001/home.html',{
        'name':'CGF',
        'html_items': ['a','b','c','d','e']
    })


# define view for chart 
class Test001ChartView(TemplateView):
    template_name = 'test001/chart.html'

    def get_context_data(self, **kwargs):
        context = super().get_context_data(**kwargs)
        context["qs"] = Test001.objects.all()
        return context


def snippet_detail(request, id):
    snippet = get_object_or_404(Snippet, id=id)
    return render(request, 'test001/snippets_detail.html', {'snippet': snippet})

class UserViewSet(viewsets.ModelViewSet):
    """
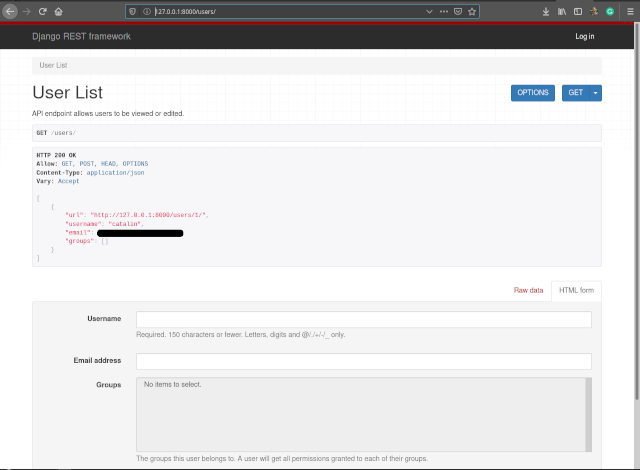
    API endpoint  allows users to be viewed or edited.
    """
    queryset = User.objects.all().order_by('-date_joined')
    serializer_class = UserSerializer

class GroupViewSet(viewsets.ModelViewSet):
    """
    API endpoint  allows groups to be viewed or edited.
    """
    queryset = Group.objects.all()
    serializer_class = GroupSerializer
The settings module for this my project is stored in mysite/settings.py and I add this:
INSTALLED_APPS = [
    ...
    'rest_framework',
]
I run the django project and works well:
python3 manage.py runserver
The http://127.0.0.1:8000/users/ page come with this output:


Sunday, December 15, 2019

Python 3.7.5 : Simple intro in CSRF.

CSRF or Cross-Site Request Forgery is a technique used by cyber-criminals to force users into executing unwanted actions on a web application.
To protect against web form CSRF attacks, it's isn't sufficient for web applications to trust authenticated users, must be equipped with a unique identifier called a CSRF token similar to a session identifier.
Django 3.0 can be used with CSRF, see the documentation page.
The CSRF process is a simple one in Django framework.
However, it's highly recommended to use the CsrfViewMiddleware instead.
To activate the django.middleware.csrf.CsrfViewMiddleware in the settings.py file.
Basically, you can use the decorator method in the view.py file.
For example, see documentation:
@csrf_protect
However csrf_protect will check only POST requests.
This annotation CSRF tells Django I'm not handling CSRF properly and don't fail this.
If I don't use this annotation then the CSRF is on if the post request is on by default and I will receive a 403 error.
As the developer using templates you don't have to know anything about that and you can use this in your template HTML5 file.
{% csrf_token %}
I can use the token with my code if I want to send it to the website.
from django.middleware.csrf import get_token
Then this can be used in view.py with a hidden form field with the name csrfmiddlewaretoken present in all outgoing POST forms.
You can used in any forms tag area like: input ...

def my_csrf_form(request):
    response = """ ... type = "hidden" name = "csrfmiddlewaretoken" value = "__token__" ... """
This can be used with:
token = get_token(request)
response = response.replace('__token__', html.escape(token))
response += dumpdata('POST', request.POST)
return HttpResponse(response)
This will get a token for the current request and fill into value = "__token__".
Using my old example from GitHub.
First, I start the project:

[mythcat@desk projects]$ source django/env/bin/activate
(env) [mythcat@desk projects]$ ls
cache  django  kaggle  logs  OSMnx  pygal_ex  SantaClaus.py
(env) [mythcat@desk projects]$ cd django/
(env) [mythcat@desk django]$ ls
env  mysite  venv
(env) [mythcat@desk django]$ cd mysite/
I change the chart.html file with this before javascript script:
... {% csrf_token %} ... 
You can use it in javascript - jQuery like this, if you want:
var csrftoken = jQuery("[name=csrfmiddlewaretoken]").val();
The CSRF protection on Django on my form can bu used in view.py:
...
# use csrf_protect
from django.views.decorators.csrf import csrf_protect
from django.utils.decorators import method_decorator
...
# define view for chart 
class Test001ChartView(TemplateView):
    csrf_protected_method = method_decorator(csrf_protect)
I test it and works well.
The documentation tells us:
The CSRF protection cannot protect against man-in-the-middle attacks, so use HTTPS with HTTP Strict Transport Security. It also assumes validation of the HOST header and that there aren’t any cross-site scripting vulnerabilities on your site (because XSS vulnerabilities already let an attacker do anything a CSRF vulnerability allows and much worse).

Saturday, December 14, 2019

Python 3.7.5 : Django admin shell by Grzegorz Tężycki.

Today I tested another python package for Django named django-admin-shell.
This package created by Grzegorz Tężycki can be found on GitHub and come with the intro:
Django application can execute python code in your project’s environment on django admin site. You can use similar as python manage shell without reloading the environment.
[mythcat@desk ~]$ cd projects/
[mythcat@desk projects]$ cd django/
...
[mythcat@desk projects]$ source django/env/bin/activate
(env) [mythcat@desk projects]$ 

(env) [mythcat@desk projects]$ pip3 install django-admin-shell --user
Collecting django-admin-shell
...
Installing collected packages: django-admin-shell
Successfully installed django-admin-shell-0.1 
First, I test my project to see if this working.
(env) [mythcat@desk projects]$ cd django/
(env) [mythcat@desk django]$ ls
env  mysite  venv
(env) [mythcat@desk django]$ cd mysite/
(env) [mythcat@desk mysite]$ ls
db.sqlite3  manage.py  mysite  test001
(env) [mythcat@desk mysite]$ python3 manage.py runserver
Watching for file changes with StatReloader
Performing system checks...

System check identified no issues (0 silenced).
December 14, 2019 - 18:23:47
Django version 3.0, using settings 'mysite.settings'
Starting development server at http://127.0.0.1:8000/
Quit the server with CONTROL-C. 
You need to add this package into the settings.py file:
INSTALLED_APPS = [
    ...
    'django_admin_shell',
    ...
]
I add this package into my url.py file:
...
from django.conf.urls import include, url
...
urlpatterns = [
...
    # admin shell 
    url(r'^admin/shell/', include('django_admin_shell.urls')),
]
After that, you can start the project and see if this working: http://127.0.0.1:8000/admin/shell/
This screenshot shows me is working well:

Saturday, December 7, 2019

Python 3.7.5 : Using the django with javascript.

The Django framework can work great with javascript.
I start this project a few days ago.
You can start a simple Django project, see my old tutorials.
I used a template for main page in my template folder named chart.html.
The chart.min.js is set on base.html.
The links work from the Django framework to HTML5 templates with javascript.
The full project can be found on my GitHub project.
See the screen output:

Tuesday, December 3, 2019

Python 3.7.5 : The new Django version 3.0 .

On December 2, 2019, comes with Django 3.0 Released.
This new release comes with many changes and features, let's see :
  • Django 3.0 supports new versions of Python 3.6, 3.7, and 3.8 (the old Django 2.2.x series is the last to support Python 3.5);
  • Django now officially supports MariaDB 10.1 and higher;
  • Django is fully async-capable by providing support for running as an ASGI application;
  • The exclusion class constraints on PostgreSQL;
  • the output BooleanField may now be used directly in QuerySet filters;
  • you can have custom enumeration types
  • cache features: add_never_cache_headers() and never_cache() now add the private directive to Cache-Control headers;
  • file storage, forms, internationalization, and logging features;
  • the management commands are new options;
  • the Requests and Responses, Models and Security has many changes and new features;
  • the Tests and test cases have a good implementation;
  • new minor features for django.contrib.admin, django.contrib.auth, django.contrib.gis, django.contrib.postgres, django.contrib.sessions, django.contrib.syndication and more
All these features can be read at the official webpage.

Saturday, April 27, 2019

Django REST framework - part 001.

Today I will introduce you a tutorial to fix some of the necessary elements presented in the old tutorial.
The manage tool shell can also give us some info:
C:\Python373\Scripts\example>python manage.py shell
Python 3.7.3 (v3.7.3:ef4ec6ed12, Mar 25 2019, 22:22:05) [MSC v.1916 64 bit (AMD6
4)] on win32
Type "help", "copyright", "credits" or "license" for more information.
(InteractiveConsole)
>>> from test001.models import test
>>> from django.db.models import Count, Min, Max, Avg
>>> out = test.objects.all
>>> out
...
One note about error method, do not use like this:
>>> out = test.objects.all
>>> out[0]
Traceback (most recent call last):
  File "", line 1, in 
TypeError: 'method' object is not subscriptable
The correct way method is:
>>> out = test.objects.all()
>>> out
]>
>>> out[0]

>>> vars(out[0])
{'_state': , 'id'
: 1, 'first_name': 'Cătălin George', 'last_name': 'Feștilă'}
We can use the annotate.
This issue can solve it into this way:
>>> minimal = test.objects.annotate(Min('last_name'))
>>> minimal
]>
>>> minimal[0]

>>> vars(minimal[0])
{'_state': , 'id'
: 1, 'first_name': 'Cătălin George', 'last_name': 'Feștilă', 'last_name__min': '
Feștilă'}
See the result of the annotate add the last_name__min value.
I created another class named city with just one field named city_name and I fill with one value:
All changes are posted at the end of this tutorial.
Let's test with the shell some of these new changes:
C:\Python373\Scripts\example>python manage.py shell
Python 3.7.3 (v3.7.3:ef4ec6ed12, Mar 25 2019, 22:22:05) [MSC v.1916 64 bit 
(AMD64)] on win32
Type "help", "copyright", "credits" or "license" for more information.
(InteractiveConsole)
>>> from test001.models import test,city
>>> from django.db.models import Count, Min, Max, Avg
>>> out_test = test.objects.all()
>>> out_city = city.objects.all()
>>> out_test
]>
>>> out_city
]>
>>> vars(out_city[0])
{'_state': , 'id'
: 1, 'city_name': 'Fălticeni'}
We can easy test the new example:
>>> minimal = test.objects.annotate(Min('last_name'))
>>> minimal
]>
>>> vars(minimal[0])
{'_state': , 'id'
: 1, 'first_name': 'Cătălin George', 'last_name': 'Feștilă', 'last_name__min': '
Feștilă'}
>>> minimal = city.objects.annotate(Min('city_name'))
>>> minimal
]>
>>> vars(minimal[0])
{'_state': , 'id'
: 1, 'city_name': 'Fălticeni', 'city_name__min': 'Fălticeni'}
>>> filter_test = test.objects.filter(id = 1)
>>> vars(filter_test)
{'model': , '_db': None, '_hints': {}, 'query': 
, '_result_cache': 
None, '_sticky_filter': False, '_for_write': False, '_prefetch_related_lookups':
(), '_prefetch_done': False, '_known_related_objects': {}, '_iterable_class': , '_fields': None}
>>> vars(filter_test[0])
{'_state': , 'id'
: 1, 'first_name': 'Cătălin George', 'last_name': 'Feștilă'}
Feel free to test with my old and the new example:
# models.py
from django.db import models

class test(models.Model):
    first_name = models.CharField(max_length=30)
    last_name = models.CharField(max_length=30)
    
class city(models.Model):
    city_name = models.CharField(max_length=30)
#admin.py
from django.contrib import admin
from .models import test, city
admin.site.register(test)
admin.site.register(city)
#serializers.py
from rest_framework import serializers
from .models import test, city

class test_serializer(serializers.ModelSerializer):
    class Meta:
        model = test
        fields = ('id', 'first_name', 'last_name')

class city_serializer(serializers.ModelSerializer):        
    class Meta:
        model = city
        fields = ('id', 'city_name')
#views.py
from django.shortcuts import render
from rest_framework import viewsets
from .models import test, city
from .serializers import test_serializer, city_serializer

class test_view(viewsets.ModelViewSet):
    #query to get all information from database
    queryset = test.objects.all()
    serializer_class = test_serializer

class city_view(viewsets.ModelViewSet):
    #query to get all information from database
    queryset = city.objects.all()
    serializer_class = city_serializer
#urls.py
from django.urls import path, include
from . import views
from rest_framework import routers

router = routers.DefaultRouter()
router.register('test001', views.test_view)
router.register('city', views.city_view)
#add to path 
urlpatterns = [
    path('', include(router.urls))
]

Friday, April 26, 2019

Python 3.7.3 and Django REST framework.

Today I tested something simpler for beginners: Django REST framework.
Once you understand how it works then it's simple to use.
This tutorial does not address the security issues generated by the REST, Django framework.
The official webpage comes with many information and technical specifications for this API:
Django REST framework is a powerful and flexible toolkit for building Web APIs.
The example I've submitted is built into the Scripts folder because I did not use the virtual environment.
Let's start installing the python module.
C:\Python373\> cd Scripts
C:\Python373\Scripts\>pip install djangorestframework
C:\Python373\Scripts\>django-admin startproject example
C:\Python373\Scripts\>cd example 
C:\Python373\Scripts\>python manage.py migrate 
C:\Python373\Scripts\>python manage.py createsuperuser
C:\Python373\Scripts\>python manage.py startapp test001
In the example folder we will make changes.
First is the settings.py file:
INSTALLED_APPS = [
...
    'rest_framework',
    'test001']
The next file is the urls.py:
from django.contrib import admin
from django.urls import path, include

urlpatterns = [
    path('admin/', admin.site.urls),
    path('', include('test001.urls'))
]
Also make changes in the test001 folder
You must create a python script and call it urls.py:
from django.urls import path, include

# this urlpatterns will fill later 
urlpatterns = []
You make changes to the file models.py and create a named class test.
This class will have two fields that we will update.
from django.db import models

class test(models.Model):
    first_name = models.CharField(max_length=30)
    last_name = models.CharField(max_length=30)
44/5000
The following commands will synchronize the database:
C:\Python373\Scripts\example>python manage.py makemigrations
...
  test001\migrations\0001_initial.py
    - Create model test
C:\Python373\Scripts\example>python manage.py migrate
...
Running migrations:
...
Another step is to add the test into admin.py script:
from django.contrib import admin
from .models import test
admin.site.register(test)
Serializers allow complex data such as querysets and model instances to be converted to native Python datatypes that can then be easily rendered into JSON , XML or other content types.
Let's create an serializers.py python script into test001 folder and use this code:
from rest_framework import serializers
from .models import test

class test_serializer(serializers.ModelSerializer):
    class Meta:
        model = test
        fields = ('id', 'first_name', 'last_name')
Also is need to update the views.py python script:
from django.shortcuts import render
from rest_framework import viewsets
from .models import test
from .serializers import test_serializer

class test_view(viewsets.ModelViewSet):
    #query to get all information from database
    queryset = test.objects.all()
    serializer_class = test_serializer
Now because is all create the last step is to fix the urls.py from test001 folder with the routers.
The REST framework adds support for automatic URL routing to Django.
from django.urls import path, include
from . import views
from rest_framework import routers

router = routers.DefaultRouter()
router.register('test001', views.test_view)
#add to path 
urlpatterns = [
    path('', include(router.urls))
]
Now you can test it with:
C:\Python373\Scripts\example>python manage.py runserver
If you want to make changes into models.py then you will need to use the commands to synchronize the database after these use"commands
makemigrations and migrate to fix errors.
If you encounter such run-time errors
"GET /static/assets/js/docs.min.js HTTP/1.1" 404 1667..."
These errors can be the result of settings like DEBUG, STATICFILES_DIRS or STATIC_ROOT from file settings.py.
Then you need to execute python manage.py collectstatic and Django goes through all directories where static files can be found and places them in your static root.
The result of this tutorial can be see on my youtube channel:

Friday, September 7, 2018

Python 3.6.4 : Test Django version 2.1.1 on Windows O.S.

I used the python version 3.6.4 to test the last Django framework version.
Add your python to the path environment variable under Windows O.S.
Create your working folder:
C:\Python364>mkdir mywebsite
Go to the folder to install all you need:
C:\Python364>cd mywebsite
Use a virtual environment using the virtualenv command:
C:\Python364\mywebsite>python -m venv myvenv
C:\Python364\mywebsite>myvenv\Scripts\activate
(myvenv) C:\Python364\mywebsite>python -m pip install --upgrade pip
(myvenv) C:\Python364\mywebsite>pip3.6 install django
Collecting django
...
If you try to run again this command you will see the version of Django:
(myvenv) C:\Python364\mywebsite>pip3.6 install django
Requirement already satisfied: django in c:\python364\mywebsite\myvenv\lib\
site-packages (2.1.1)
Requirement already satisfied: pytz in c:\python364\mywebsite\myvenv\lib\
site-packages (from django) (2018.5)
You need to run the django-admin command:
(myvenv) C:\Python364\mywebsite>cd myvenv
(myvenv) C:\Python364\mywebsite\myvenv>cd Scripts
(myvenv) C:\Python364\mywebsite\myvenv\Scripts>django-admin.exe startproject mysite
(myvenv) C:\Python364\mywebsite\myvenv\Scripts>dir my*
(myvenv) C:\Python364\mywebsite\myvenv\Scripts>cd mysite
(myvenv) C:\Python364\mywebsite\myvenv\Scripts\mysite&
Make a change to settings file:
(myvenv) C:\Python364\mywebsite\myvenv\Scripts\mysite>cd mysite
(myvenv) C:\Python364\mywebsite\myvenv\Scripts\mysite\mysite>notepad settings.py
Change UTC timezone:
TIME_ZONE = 'Europe/Paris'
Change host:
ALLOWED_HOSTS = ['192.168.0.185','mysite.com']
The next step is to use these commands:
(myvenv) C:\Python364\mywebsite\myvenv\Scripts\mysite\mysite>cd ..
(myvenv) C:\Python364\mywebsite\myvenv\Scripts\mysite>python manage.py migrate
Operations to perform:
  Apply all migrations: admin, auth, contenttypes, sessions
Running migrations:
  Applying contenttypes.0001_initial... OK
  Applying auth.0001_initial... OK
  Applying admin.0001_initial... OK
  Applying admin.0002_logentry_remove_auto_add... OK
  Applying admin.0003_logentry_add_action_flag_choices... OK
  Applying contenttypes.0002_remove_content_type_name... OK
  Applying auth.0002_alter_permission_name_max_length... OK
  Applying auth.0003_alter_user_email_max_length... OK
  Applying auth.0004_alter_user_username_opts... OK
  Applying auth.0005_alter_user_last_login_null... OK
  Applying auth.0006_require_contenttypes_0002... OK
  Applying auth.0007_alter_validators_add_error_messages... OK
  Applying auth.0008_alter_user_username_max_length... OK
  Applying auth.0009_alter_user_last_name_max_length... OK
  Applying sessions.0001_initial... OK
Let's try these steps with the browser:
(myvenv) C:\Python364\mywebsite\myvenv\Scripts\mysite>python manage.py runserver
 192.168.0.185:8080
Performing system checks...

System check identified no issues (0 silenced).
September 07, 2018 - 16:30:13
Django version 2.1.1, using settings 'mysite.settings'
Starting development server at http://192.168.0.185:8080/
Quit the server with CTRL-BREAK.
[07/Sep/2018 16:30:16] "GET / HTTP/1.1" 200 16348
[07/Sep/2018 16:30:21] "GET / HTTP/1.1" 200 16348
This is the result:

Let's start Django application named myblog and add to settings.py :
(myvenv) C:\Python364\mywebsite\myvenv\Scripts\mysite>python manage.py startapp
myblog

(myvenv) C:\Python364\mywebsite\myvenv\Scripts\mysite>dir
(myvenv) C:\Python364\mywebsite\myvenv\Scripts\mysite>cd mysite
(myvenv) C:\Python364\mywebsite\myvenv\Scripts\mysite\mysite>notepad settings.py
Search into settings.py this line and add 'myblog' and comma after, see:
# Application definition

INSTALLED_APPS = [
    'django.contrib.admin',
    'django.contrib.auth',
    'django.contrib.contenttypes',
    'django.contrib.sessions',
    'django.contrib.messages',
    'django.contrib.staticfiles',
    'myblog',
]
Let's change models.py from myblog folder:
(myvenv) C:\Python364\mywebsite\myvenv\Scripts\mysite\mysite>cd ..
(myvenv) C:\Python364\mywebsite\myvenv\Scripts\mysite>cd myblog
(myvenv) C:\Python364\mywebsite\myvenv\Scripts\mysite\myblog>notepad models.py
Add this source code:
from django.db import models
# Create your models here.
from django.utils import timezone
from django.contrib.auth.models import User

class Post(models.Model):
 author = models.ForeignKey(User,on_delete=models.PROTECT)
 title = models.CharField(max_length=200)
 text = models.TextField()
 create_date = models.DateTimeField(default=timezone.now)
 published_date = models.DateTimeField(blank=True, null=True)
 
 def publish(self):
  self.publish_date = timezone.now()
  self.save()
 def __str__(self):
  return self.title
Go and run this command manage.py for model Post with makemigrations myblog and migrate myblog :
(myvenv) C:\Python364\mywebsite\myvenv\Scripts\mysite\myblog>cd ..
(myvenv) C:\Python364\mywebsite\myvenv\Scripts\mysite>python manage.py 
makemigrations myblog
Migrations for 'myblog':
  myblog\migrations\0001_initial.py
    - Create model Post
(myvenv) C:\Python364\mywebsite\myvenv\Scripts\mysite>python manage.py migrate 
myblog
Operations to perform:
  Apply all migrations: myblog
Running migrations:
  Applying myblog.0001_initial... OK
Add this source code to admin.py from myblog folder:
(myvenv) C:\Python364\mywebsite\myvenv\Scripts\mysite>cd myblog
(myvenv) C:\Python364\mywebsite\myvenv\Scripts\mysite\myblog>notepad admin.py
Let's test again:
(myvenv) C:\Python364\mywebsite\myvenv\Scripts\mysite\myblog>cd ..
(myvenv) C:\Python364\mywebsite\myvenv\Scripts\mysite>python manage.py runserver
 192.168.0.185:8080
Performing system checks...

System check identified no issues (0 silenced).
September 07, 2018 - 17:19:00
Django version 2.1.1, using settings 'mysite.settings'
Starting development server at http://192.168.0.185:8080/
Quit the server with CTRL-BREAK.
Check the admin interface with add admin word to link, see: http://192.168.0.185:8080/admin

If you see some errors this will be fixed later.
Let's make a superuser with this command:
(myvenv) C:\Python364\mywebsite\myvenv\Scripts\mysite>python manage.py 
createsuperuser
Username (leave blank to use 'catafest'): catafest
Email address: catafest@yahoo.com
Password:
Password (again):
This password is too short. It must contain at least 8 characters.
Bypass password validation and create user anyway? [y/N]: y
Superuser created successfully.
Run again this command and log in with your user and password:
(myvenv) C:\Python364\mywebsite\myvenv\Scripts\mysite>python manage.py runserver
 192.168.0.185:8080
This is the result of users and posts.

Click on the Add button from Posts to add your post.
The result is this:

I don't make settings for URL and view.
This will be changed by users.

Friday, August 24, 2012

Python 3.2 : Start with Django 1.4.

Although most of us prefer the python version 2.6, today I tried to install the latest version of django and python 2.3.2 .
Make a new folder , named test-dj .
$mkdir test-dj
$cd test-dj/
On the official site, I got the two archives:
django-django-1.4-919-ge57338f.zip
Python-3.2.3.tar.bz2
I will start with the installation of python. We unzip the archive:
$tar xvjf Python-3.2.3.tar.bz2 
We execute the following commands to install python:
$cd Python-3.2.3
$./configure
$make all
$sudo make altinstall
# python3.2 setup.py install 
Let's see what we have.
$ whereis  python3
python3: /usr/lib/python3.0 /usr/local/bin/python3.2m-config
/usr/local/bin/python3.2 /usr/local/bin/python3.2m 
/usr/local/lib/python3.2
As you see it's ...
python3.2
python3.2m
python3.2m-config
In accordance with the PEP-3149 we can got this:
Python implementations MAY include additional flags in the file name tag as appropriate. For example, on POSIX systems these flags will also contribute to the file name:

        * --with-pydebug (flag: d)
        * --with-pymalloc (flag: m)
        * --with-wide-unicode (flag: u)

Now we need to install django.
$unzip django-django-1.4-919-ge57338f.zip
Go to the django folder:
$cd django-django-e57338f/
# python3.2 setup.py install 
Now , we can test it:
# python3.2
Python 3.2.3 (default, Aug 24 2012, 19:24:21) 
[GCC 4.4.1] on linux2
Type "help", "copyright", "credits" or "license" for more information.
>>> import django 
>>> print(django.get_version())
1.5
>>> 
I will make another tutorial about how to configure the django to have one website.