analitics

Pages

Showing posts with label bpy. Show all posts

Thursday, May 26, 2022

Blender 3D and python scripting - part 007.

In this tutorial I will show you how you create and use lights.
I used the same old source sode from the last tutorial.
Depending on the type of light created, their properties may change. Changing the on-fly light type cannot be done by a simple source code. Obviously you can recreate a new type of light with the new type you want.
This source code I added after this line of source code: scene = bpy.context.scene
# this create a light by type ['POINT', 'SUN', 'SPOT', 'HEMI', 'AREA']
light_data = bpy.data.lights.new('light', type='POINT')
# set light object 
light = bpy.data.objects.new('light', light_data)
# link light to collections
bpy.context.collection.objects.link(light)

light.location[0] = -1
light.location[1] = 3
light.location[2] = 3

light.data.color = (1.0, 0.0, 0.0)
light.data.energy=200.0
light.data.specular_factor = 0.5
# if you use another type like 'SUN' 
# then you can change properties like: angle 
#light.data.angle = pi * 10.0 / 180.0 

# get the name of the object light 
lamp = bpy.data.lights[light.name]

Wednesday, May 25, 2022

Blender 3D and python scripting - part 006.

In this tutorial I will show you how to use the camera and render an image.
I kept the source code from the old tutorial 005 and made the following changes:
I defined the global PI constant because I used it outside the definition.
import bpy

#define the pi global 
pi = 3.1415926
I added to the old source code the part of adding camera, translation, rotation, rendering settings and rendering an image called box_640_480.png in the 3D folder on the local disk.
You can see in the example below the added source code:
# define the new camera named NewCamera
camera_data = bpy.data.cameras.new(name='NewCamera')
# set camera_data to object 
camera_object = bpy.data.objects.new('ObjectCamera', camera_data)
# link camera object to scene
bpy.context.scene.collection.objects.link(camera_object)
# set active camera in the current scene by object
bpy.context.scene.camera = bpy.data.objects['ObjectCamera']
# set location 
camera_object.location = [0,-5,1]
# set rotation mode
camera_object.rotation_mode = 'XYZ'
# set the rotate the camerea using rotation_euler
bpy.data.objects[camera_object.name_full].rotation_euler = (90*(pi/180),0,0)

scene = bpy.context.scene

#these settings will set the render output
bpy.context.scene.cycles.samples = 1
scene.render.resolution_x = 640
scene.render.resolution_y = 480
scene.render.resolution_percentage = 100
scene.render.use_border = False
scene.render.image_settings.file_format='PNG'
scene.render.filepath='C:/3D/box_640_480.png'
bpy.ops.render.render(write_still=1)

Tuesday, May 24, 2022

Blender 3D and python scripting - part 005.

In this tutorial I will recreate the same box but with a more complex source code.
In the previous tutorial I used the same source code several times...
    obj = bpy.ops.mesh.primitive_plane_add(size=2, 
    calc_uvs=True, 
    enter_editmode=False, 
    align='CURSOR', 
    location=location, 
    rotation=(0, 0, 0), 
    scale=(0,0,0)
    )
    
    # rename the object
    bpy.context.object.name = obj_name
    # return the object reference
    return bpy.context.object
It is easier to understand the steps taken and then move on to optimizing them in complex forms.
Obviously a presentation of the source code in this tutorial will show you the differences.
I will add that the source code does not include scalar transformations and is limited to a box with size 1.
import bpy

def create_plane_XYZ(loc, obj_name):
    #define the pi 
    pi = 3.1415926
    # this is a definition like a tuple
    rot = (0,0,0)
    # need to convert it to a list in order to add new values
    rot_list = list(rot)
    # this ang variable will rotate obj to the 90-degree angle 
    ang = -90*(pi/180)
    ang_inc = 45*(pi/180)
    if loc[0] < 0:
        rot_list[1]=ang

    if loc[0] > 0: 
        rot_list[1]=ang

    if loc[1] < 0:
        rot_list[0]=ang
        
    if loc[1] > 0: 
        rot_list[0]=ang
    # this check if the two value from position of plane is not zero
    if loc[1] != loc[2] != 0: 
        rot_list[0]=ang_inc
    # this convert a list back to tuple 
    rot=tuple(rot_list)
    # this create the plane 
    obj = bpy.ops.mesh.primitive_plane_add(size=2, 
    calc_uvs=True, 
    enter_editmode=False, 
    align='CURSOR', 
    location=loc, 
    rotation= rot, 
    scale=(0,0,0)
    )
    # rename the object
    bpy.context.object.name = obj_name
    # return the object reference
    return bpy.context.object

# this will create a plane on X and translate with -1 on Y 
planeX001 = create_plane_XYZ((0,-1,0), "Plane-X")
# this will create a plane on X and translate with 1 on Y 
planeX002 = create_plane_XYZ((0,1,0), "Plane+X")
# this will create a plane on Y and translate with -1 on X 
planeY001 = create_plane_XYZ((-1,0,0), "Plane-Y")
# this will create a plane on X and translate with 1 on Y 
planeY002 = create_plane_XYZ((1,0,0), "Plane+Y")
# this will create a plane with 45 degree because two value on tuple is not zero
planeZ001 = create_plane_XYZ((0,-0.25,1.66), "Plane-Y+Z")

Monday, May 23, 2022

Blender 3D and python scripting - part 004.

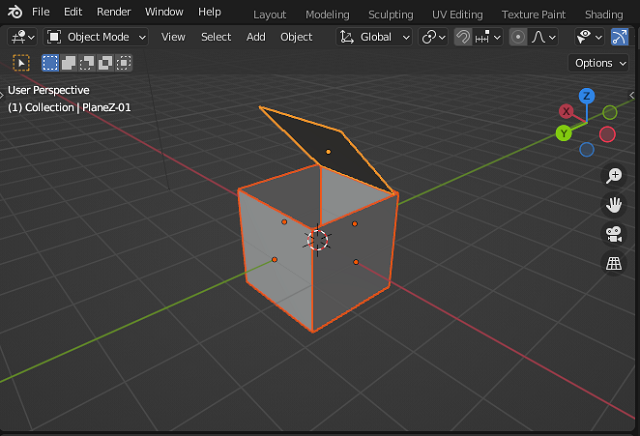
In this tutorial, I will show you how to create a box from planes, see the screenshot:
You can see I used the math python package and I created rotation by radians and rotation object for three custom planes.
This is the source code:
import bpy

import math

def DegToRad(angle):
    """convert to radians"""
    return angle*(math.pi/180)


def RotOBJ(name, angles):
    """rotate obj to the specified angles"""
    rotation = [DegToRad(angle) for angle in angles]
    bpy.data.objects[name].rotation_euler = rotation
    
def create_plane_X(location, obj_name):

    obj = bpy.ops.mesh.primitive_plane_add(size=2, 
    calc_uvs=True, 
    enter_editmode=False, 
    align='CURSOR', 
    location=location, 
    rotation=(0, 0, 0), 
    scale=(0,0,0)
    )
    
    # rename the object
    bpy.context.object.name = obj_name
    # return the object reference
    return bpy.context.object

def create_plane_Y(location, obj_name):

    obj = bpy.ops.mesh.primitive_plane_add(size=2, 
    calc_uvs=True, 
    enter_editmode=False, 
    align='CURSOR', 
    location=location, 
    rotation=(0, 0, 0), 
    scale=(0,0,0)
    )
    
    # rename the object
    bpy.context.object.name = obj_name
    # return the object reference
    return bpy.context.object

def create_plane_Z(location, obj_name):

    obj = bpy.ops.mesh.primitive_plane_add(size=2, 
    calc_uvs=True, 
    enter_editmode=False, 
    align='CURSOR', 
    location=location, 
    rotation=(0, 0, 0), 
    scale=(0,0,0)
    )
    
    # rename the object
    bpy.context.object.name = obj_name
    # return the object reference
    return bpy.context.object

n = 1

planeX001 = create_plane_X((0,-1,0), "PlaneX-{:02d}".format(n))
RotOBJ(planeX001.name, [-90, 0, 0])
planeX002 = create_plane_X((0,1,0), "PlaneX-{:02d}".format(n))
RotOBJ(planeX002.name, [-90, -0, 0])

planeY001 = create_plane_Y((-1,0,0), "PlaneY-{:02d}".format(n))
RotOBJ(planeY001.name, [0, -90, 0])
planeY002 = create_plane_Y((1,0,0), "PlaneY-{:02d}".format(n))
RotOBJ(planeY002.name, [0, -90, 0])

planeZ001 = create_plane_Z((0,-0.25,1.66), "PlaneZ-{:02d}".format(n))
RotOBJ(planeZ001.name, [45, 0, 0])

Sunday, May 22, 2022

Blender 3D and python scripting - part 003.

In the first tutorial I presented a simple script and in this one I improved it with a way to create lines with a number of points, to use pressurization and coloring according to these points.
I added comments in the source code to make it easier to understand.
Here is the result obtained for nineteen points:
This is the source code:
import bpy 
import random

#this is a for lines with N poins 
N = 19 

# this is default python script from the first tutorial
gpencil_data = bpy.data.grease_pencils.new("GPencil")
gpencil = bpy.data.objects.new(gpencil_data.name, gpencil_data)
bpy.context.collection.objects.link(gpencil)

gp_layer = gpencil_data.layers.new("lines")

gp_frame = gp_layer.frames.new(bpy.context.scene.frame_current)

gp_stroke = gp_frame.strokes.new()

gp_stroke.points.add(count=N)

# let's create a new material for pencil stroke 
gp_material_001 = bpy.data.materials.new(name="Grease pencil material 001")

# if you want to use Nodes 
gp_material_001.use_nodes = True

#this will add a diffuse color for this material 
gp_material_001.diffuse_color = (0.0, 0.0, 0.0, 1)

# create a new material for this grease pencil
bpy.data.materials.create_gpencil_data(gp_material_001)
# add the material to the grese pencil defined like gpencil 
gpencil.data.materials.append(gp_material_001)

for i in range (N):
    rand1 = random.randint(-3, 3)
    rand2 = random.randint(-3, 3)
    rand_size = random.randint(70, 76)
    gp_stroke.line_width = rand_size
    gp_stroke.points[i].co = (rand1,rand2,rand1)
    gp_stroke.points[i].co = (rand2,rand1,rand2)

    #this will create a random pressure 
    rand_pressure = random.randint(-3, 3) * 3
    #create random color for Red Green and Blue 
    rand_color_R = random.randint(0, 1)
    rand_color_G = random.randint(0, 1)
    rand_color_B = random.randint(0, 1)
    # set the pressure 
    gp_stroke.points[i].pressure = rand_pressure
    # set the color RGB with transparency 1
    gp_stroke.points[i].vertex_color = (rand_color_R,rand_color_G,rand_color_B, 1) 

Thursday, May 19, 2022

Blender 3D and python scripting - part 002.

In today's tutorial I will show you how to create a sphere and how to add a material to it.
The source code is very simple with two functions one is for the sphere and the second one is the material of this, see:
import bpy

def create_sphere(radius, distance_to_center, obj_name):

    obj = bpy.ops.mesh.primitive_uv_sphere_add(
        radius=radius,
        location=(distance_to_center, 0, 0),
        scale=(1, 1, 1)
    )
    # rename the object
    bpy.context.object.name = obj_name
    # return the object reference
    return bpy.context.object


def create_emission_shader(color, strength, mat_name):
    # create a new material shader
    mat = bpy.data.materials.new(mat_name)
    # enable the node-graph edition mode
    mat.use_nodes = True
    
    # clear all starter nodes
    nodes = mat.node_tree.nodes
    nodes.clear()

    # add the Emission node
    node_emission = nodes.new(type="ShaderNodeEmission")
    # (input[0] is the color)
    node_emission.inputs[0].default_value = color
    # (input[1] is the strength)
    node_emission.inputs[1].default_value = strength
    
    # add the Output node
    node_output = nodes.new(type="ShaderNodeOutputMaterial")
    
    # link the two nodes
    links = mat.node_tree.links
    link = links.new(node_emission.outputs[0], node_output.inputs[0])

    # return the material reference
    return mat

n = 1
r = 1.0
d = 1.5

sphere001 = create_sphere(r, d, "Sphere-{:02d}".format(n))

sphere001.data.materials.append(
    create_emission_shader(
        (1, 1, 1, 1), 100, "SphereMat001"
    )
)

Wednesday, May 18, 2022

Blender 3D and python scripting - part 001.

Today I started a series of tutorials on python scripting and Blender 3D.
The first tutorial is how to draw using the Blender 3D features with the grease pencil utility using the Python scripting language.
Open Blender 3D in the scripting section and enter the source code below.
import bpy 
import random
rand1 = random.randint(-3, 3)
rand2 = random.randint(-3, 3)
rand_size = random.randint(70, 76)

gpencil_data = bpy.data.grease_pencils.new("GPencil")
gpencil = bpy.data.objects.new(gpencil_data.name, gpencil_data)
bpy.context.collection.objects.link(gpencil)

gp_layer = gpencil_data.layers.new("lines")

gp_frame = gp_layer.frames.new(bpy.context.scene.frame_current)

gp_stroke = gp_frame.strokes.new()
gp_stroke.line_width = rand_size

gp_stroke.points.add(count=4)

gp_stroke.points[0].co = (rand1,rand2,rand1)
gp_stroke.points[1].co = (rand2,rand1,rand2)
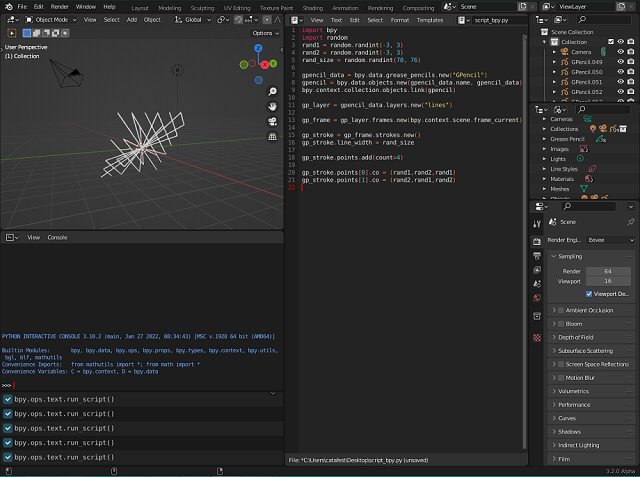
Run the script several times to see the effect produced.
Here is the result of running this script:

Tuesday, April 21, 2020

Python 3.7.4 : A simple addon for Blender 3D version 2.8 .

Today I tested the python from Blender 3D software.
This software named Blender 3D come with python version 3.7.4 .
The version of this 3D tool is 2.82a .
This is a default addon with these python files: __init__.py , build.py, catafest_addon_start.py.
You can see a folder and images, but is not part of these tutorial.
The full source code of this addon can be found on my GitHub account on this project.
First python file named build.py will create the addon using this command:
python .\build.py
The source code for this python file is:
#!/usr/bin/env python

from os.path import abspath, dirname, join as pjoin
import zipfile

SRC_DIR = dirname(abspath(__file__))

with zipfile.ZipFile('catafest_addon_start.zip', 'w', zipfile.ZIP_DEFLATED) as arch:
    for filename in [
            '__init__.py',
            'catafest_addon_start.py',
            'textures/texture_001.png']:
        arch.write(pjoin(SRC_DIR, filename), 'add_mesh_catafest_blender_start/'+filename)

print('created file: catafest_addon_start.zip')
The next file named __init__.py will install the addon:
bl_info = {
    "name": "catafest addon start",
    "author": "Catalin George Festila",
    "license": "GPL",
    "version": (1, 1, 1),
    "blender": (2, 82, 0),
    "location": "View3D > Add > Mesh",
    "description": "Procedurally generate 3D catafest_addon_start from a random seed.",
    "warning": "",
    "wiki_url": "https://github.com/catafest/catafest_blender_start/blob/master/README.md",
    "tracker_url": "https://github.com/catafest/catafest_blender_start/issues",
    "category": "Add Mesh"
}

if "bpy" in locals():
    # reload logic (magic)
    import importlib
    importlib.reload(catafest_addon_start)
else:
    from . import catafest_addon_start

import bpy
from bpy.props import StringProperty, BoolProperty, IntProperty
from bpy.types import Operator

class Generate_catafest_mesh(Operator):
    """Procedurally generate a catafest 3D mesh from a random seed."""
    bl_idname = "mesh.generate_mesh"
    bl_label = "catafest_blender_start"
    bl_options = {'REGISTER', 'UNDO'}

    random_seed = StringProperty(default='', name='Seed')


    def execute(self, context):
        catafest_addon_start.generate_mesh(
            self.random_seed)
        return {'FINISHED'}

def menu_func(self, context):
    self.layout.operator(Generate_catafest_mesh.bl_idname, text="catafest_blender_start", icon="INFO")

def register():
    #bpy.utils.register_module(__name__)
    bpy.utils.register_class(Generate_catafest_mesh)
    #bpy.types.INFO_MT_mesh_add.append(menu_func)
    bpy.types.VIEW3D_MT_mesh_add.append(menu_func)

def unregister():
    #bpy.utils.unregister_module(__name__)
    bpy.utils.unregister_class(Generate_catafest_mesh)
    bpy.types.VIEW3D_MT_mesh_add.remove(menu_func)

if __name__ == "__main__":
    register()
The last one come with the addon features, for example to create a mesh.
This script will not create the mesh, but will show you how can be used, see generate_mesh.
You can change this generate_mesh to do your tasks.
# -*- coding:utf-8 -*-
#
# catafest_addon_start.py
#
# This is a Blender script that uses procedural generation to create
# a catafest 3D mesh from a random seed. Tested with Blender 2.77a.
#
# catalinfest@gmail.com
# https://github.com/catafest/catafest_blender_start
#
# ##### BEGIN GPL LICENSE BLOCK #####
#
#  This program is free software: you can redistribute it and/or modify
#  it under the terms of the GNU General Public License as published by
#  the Free Software Foundation, either version 3 of the License, or
#  (at your option) any later version.
#
#  This program is distributed in the hope that it will be useful,
#  but WITHOUT ANY WARRANTY; without even the implied warranty of
#  MERCHANTABILITY or FITNESS FOR A PARTICULAR PURPOSE.  See the
#  GNU General Public License for more details.
#
#  You should have received a copy of the GNU General Public License
#  along with this program.  If not, see .
#  All rights reserved.
#
# ##### END GPL LICENSE BLOCK #####

# 

#import all python modules 
import sys
import os
import os.path
import bpy
import bmesh
import datetime
from math import sqrt, radians, pi, cos, sin
from mathutils import Vector, Matrix
from random import random, seed, uniform, randint, randrange
from enum import IntEnum
from colorsys import hls_to_rgb

DIR = os.path.dirname(os.path.abspath(__file__))

# get resource path
def resource_path(*path_components):
    return os.path.join(DIR, *path_components)

# Deletes all existing catafest_addon_start and unused materials from the scene
def reset_scene():
    for item in bpy.data.objects:
        item.select = item.name.startswith('catafest_addon_start')
    bpy.ops.object.delete()
    for material in bpy.data.materials:
        if not material.users:
            bpy.data.materials.remove(material)
    for texture in bpy.data.textures:
        if not texture.users:
            bpy.data.textures.remove(texture)
# Generate mesh            
def generate_mesh(random_seed=''):
    if random_seed:
        seed(random_seed)

    # Let's start with a unit BMesh cube scaled randomly
    bm = bmesh.new()
    bmesh.ops.create_cube(bm, size=1)

if __name__ == "__main__":
    
    reset_scene()
    for area in bpy.context.screen.areas:
        if area.type == 'VIEW_3D':
            ctx = bpy.context.copy()
            ctx['area'] = area
            ctx['region'] = area.regions[-1]
            bpy.ops.view3d.view_selected(ctx)
    
    scene = bpy.data.scenes["Scene"]
    scene.render.resolution_x = res_x
    scene.render.resolution_y = res_y
    scene.camera.rotation_mode = 'XYZ'
    scene.camera.data.angle = radians(fov)
    frame = 0
    timestamp = datetime.datetime.now().strftime('%Y%m%d_%H%M%S')

Friday, June 30, 2017

Blender 3D - bpy and scripting - part 001.

The tutorial for today is bpy python module used by Blender 3D software for scripting.
The last Application Programming Interface (A.P.I.) for Blender 3D can be found here.
You need to take a look at the link to see the base of this python module.
The example I will start today is a python script that helps me to deal with Blender 3D.
First I put the script named catafest.py into Blender 3D path: C:\Program Files\Blender Foundation\Blender\2.78\python\lib.
The reason is to be load by Blender 3D application.
Let's start with the script:
First, you need to import the Blender 3D python module named bpy.
This allows us to deal with Blender 3D using python and Application Programming Interface (A.P.I.).
The script is an example not a lib script for Blender 3D.
The goal of this script is to show how to deal with python scripting into Blender 3D.
If you want to make a lib for the Blender 3D then you need to read about Python’s standard library - here.
My script just creates materials. To do that I used functions to make materials - mat, set the material to the object - set_mat and the run function to see how is working.
Let's see the python script:
import bpy

def mat(name,df_col,df_sh,df_int,sp_col,sp_sh,sp_int,alp,amb):
    mat = bpy.data.materials.new(name)
    mat.diffuse_color = df_col
    mat.diffuse_shader = df_sh
    mat.diffuse_intensity = df_int
    mat.specular_color = sp_col
    mat.specular_shader = sp_sh
    mat.specular_intensity = sp_int
    mat.alpha = alp
    mat.ambient = amb
    return mat

def set_mat(ob, mat):
    me = ob.data
    me.materials.append(mat)

def run(origin):
    # create two materials
    red = mat('Red', (1,0,0),'LAMBERT',1.0,(1,1,1),'COOKTORR',0.5, 1,1)
    blue = mat('Green', (0,1,0),'LAMBERT',1.0,(0,0.5,0.5),'COOKTORR',0.5, 1, 0.5)

    # create red cube
    bpy.ops.mesh.primitive_cube_add(location=origin)
    set_mat(bpy.context.object, red)
    # create a green torus
    bpy.ops.mesh.primitive_torus_add(location=origin)
    bpy.ops.transform.translate(value=(1,0,0))
    set_mat(bpy.context.object, blue)

if __name__ == "__main__":
    run((0,0,0))
To run this script put the script into the lib path of Blender 3D software.
Open the Blender 3D and go to the scripting area:

Now about the source code of this script.
As you know the Blender 3D interface let you add and change objects and materials.
Each material comes with a name, colors with a diffuse and specular property, alpha color, ambient color, etc. see the documentation.
Some values come like strings and can get it from Blender 3D interface, see:
diffuse_shader 
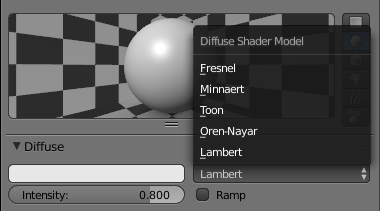
and the
specular_shader
.
The set_mat function just load one object using: me = ob.data
Then put the material to object using append function.
The run function is used to show the result with how to make materials, create objects with this materials.
I run into Blender 3D - Console area:
YTHON INTERACTIVE CONSOLE 3.5.2 (default, Dec  1 2016, 20:58:16) [MSC v.1800 64 bit (AMD64)]

Command History:     Up/Down Arrow
Cursor:              Left/Right Home/End
Remove:              Backspace/Delete
Execute:             Enter
Autocomplete:        Ctrl-Space
Zoom:                Ctrl +/-, Ctrl-Wheel
Builtin Modules:     bpy, bpy.data, bpy.ops, bpy.props, bpy.types, bpy.context, bpy.utils, bgl, blf, mathutils
Convenience Imports: from mathutils import *; from math import *
Convenience Variables: C = bpy.context, D = bpy.data

>>> import catafest 
>>> dir(catafest)
['__builtins__', '__cached__', '__doc__', '__file__', '__loader__', '__name__', '__package__', '__spec__',
 'bpy', 'mat', 'run', 'set_mat']

>>> catafest.run((0,0,0))
This is the result of the script:


Friday, April 14, 2017

Blender 3D - ellipsoid.

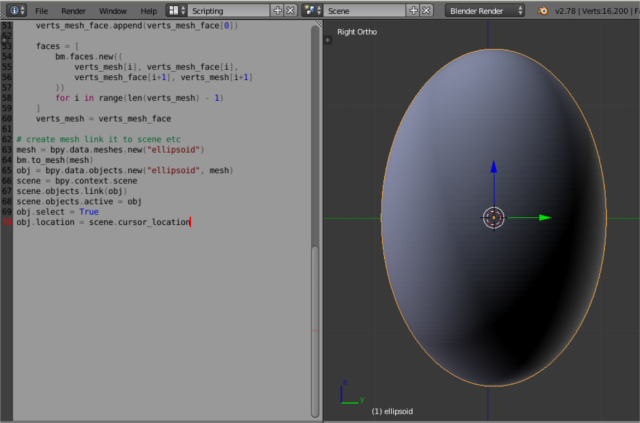
This is a simple way to use Blender 3D - version 2.78c with python scripting tool to make one ellipsoid.

The ellipsoid may be parameterized in several ways but I used the sin and cos functions:
x = sin(theta) * sin(phi)
y = cos(theta) * sin(phi)
z = cos(phi)

The steps I follow are:
  • make points of ellipsoid - CoordsPoints
  • define an ellipsoid vectors 
  • create a new mesh 
  • make rings for faces
  • make an ellipsoid
  • The verts_mesh and verts_mesh_face are used to make faces
  • put all into the Blender 3D scene

import bpy
import bmesh
from math import degrees, radians, sin, cos, tan
from mathutils import Vector


class CoordsPoints:
    @property
    def xyz(self):
        theta = self.theta
        phi = self.phi
        x = sin(theta) * sin(phi)
        y = cos(theta) * sin(phi)
        z = cos(phi)
        R = self.R
        return R * Vector((x,y,z))

    def __init__(self, R, theta, phi):
        self.R = R
        self.theta = theta
        self.phi = phi
        #self.xyz = self.point(theta, phi)

    def __repr__(self):
        return "Coords(%.4f, %.4f)" % (degrees(self.theta),
                                               degrees(self.phi))
# define the ellipsoid method.
def ellipsoid(a, b, c):
    def ellipsoid(v):
        x = a * (v.x)
        y = b * (v.y)
        z = c * (v.z)
        return Vector((x, y, z))
    return ellipsoid

# make the ellipsoid bmesh
bm = bmesh.new()

# TODO come up with a nicer way to do this.
rings = [[CoordsPoints(1, radians(theta), radians(phi)) 
                 for theta in range (0, 360, 2)]
                 for phi in range(0, 180, 2)]

h = ellipsoid(1.0, 1.0, 1.5)

verts_mesh = [bm.verts.new(h(p.xyz)) for p in rings[0]]
verts_mesh.append(verts_mesh[0])
for ring in range(1, len(rings)):

    verts_mesh_face = [bm.verts.new(h(p.xyz)) for p in rings[ring]]
    verts_mesh_face.append(verts_mesh_face[0])

    faces = [
        bm.faces.new((
            verts_mesh[i], verts_mesh_face[i],
            verts_mesh_face[i+1], verts_mesh[i+1]
        ))
        for i in range(len(verts_mesh) - 1)
    ]
    verts_mesh = verts_mesh_face

# create mesh link it to scene 
mesh = bpy.data.meshes.new("ellipsoid")
bm.to_mesh(mesh)
obj = bpy.data.objects.new("ellipsoid", mesh)
scene = bpy.context.scene
scene.objects.link(obj)
scene.objects.active = obj
obj.select = True
obj.location = scene.cursor_location

Wednesday, May 15, 2013

Use python to render scene in Blender 3D.

The python script is very simple.

I used my scene with Mickey Mouse (my boy like this funny cartoon).

This is the python script.

import bpy
bpy.context.scene.render.use_border = False
bpy.context.scene.render.use_crop_to_border = False
bpy.ops.render.render()
R="Render Result"
bpy.data.images[R].save_render("/home/your_username/test_render.png")

See the output image:


The next source code it's used for border and crop.

Only if you want to use it.

bpy.context.scene.render.use_border = False
bpy.context.scene.render.use_crop_to_border = False

Also you can use this to set resolution percentage.

For example if you want to render just 10% of resolution use this:

bpy.context.scene.render.resolution_percentage =10