analitics

Pages

Showing posts with label notebook. Show all posts

Tuesday, June 15, 2021

Python 3.6.9 : My colab tutorials - part 014.

Here we come to the 16th notebook created with the colab utility from Google.
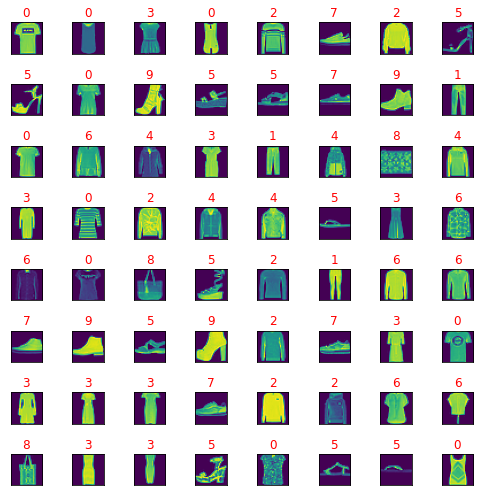
In this notebook, I will show you how you can view a dataset of images.
See the next image with a few of the shapes of the dataset:
You can find the full source code on my GitHub account.

Saturday, June 5, 2021

Python 3.6.9 : My colab tutorials - part 013.

In this tutorial created with the online tool google colab, we exemplified again how to access the IMDB dataset, which contains from the index point of view and what is the correspondence with the IMDB reviews, as well as how to work and create several sets of data for trains and what is the difference between them.
You can see the source code in python on this notebook.

Tuesday, June 1, 2021

Python 3.6.9 : My colab tutorials - part 012.

The purpose of this tutorial is to show the IMDB review dataset.
You can find the source code on my GitHub account here.

Thursday, May 27, 2021

Python 3.6.9 : My colab tutorials - part 011.

The purpose of this tutorial is to use the google TPU device together with Keras.
You need to set from the Edit menu and set for the notebook the device called TPU.
You can find the source code on my GitHub account here.

Sunday, December 6, 2020

Python 3.6.9 : My colab tutorials - part 010.

In this tutorial created with Colab online tool I used HTML and JavaScript source code.
The tutorial is easy to understand and use it.
You can see all my examples of my GitHub repo.

Thursday, December 3, 2020

Python 3.6.9 : My colab tutorials - part 009.

I update may colab work and I add new notebooks.
You can see all of these on my GitHub account.
These are examples:
  • catafest_009.ipynb - show you how to use %% colab features;
  • catafest_010.ipynb - example with Detectron2 is Facebook AI Research's with state-of-the-art object detection algorithms;
  • catafest_011.ipynb - test a sound classification with YAMNet from a web example - not very happy with the result;

Tuesday, August 4, 2020

Python 3.6.9 : My colab tutorials - part 008.

Today I deal with these two python packages named selenium and chromium-chromedriver.
I used selenium to get pieces of information from webpages.
These examples can be found at my GitHub project colab on the notebook named catafest_008.

Sunday, July 26, 2020

Python 3.6.9 : My colab tutorials - parts 006 - 007.

This tutorial is called: My colab tutorials - parts 006 - 007.
The only reason for synchronization with the source code from my GitHub account on the Colab project.
I like collab more and more because I can quickly test the source code.
The example is taken from here and adapted to work on Colab and the new version of numba
Here is a simple example with the python numba package to creat that Mandelbrot fractal set.
import numba
from numba import jit

@jit
def mandel(x, y, max_iters):
  """
    Given the real and imaginary parts of a complex number,
    determine if it is a candidate for membership in the Mandelbrot
    set given a fixed number of iterations.
  """
  c = complex(x, y)
  z = 0.0j
  for i in range(max_iters):
    z = z*z + c
    if (z.real*z.real + z.imag*z.imag) >= 4:
      return i

  return max_iters

@jit
def create_fractal(min_x, max_x, min_y, max_y, image, iters):
  height = image.shape[0]
  width = image.shape[1]

  pixel_size_x = (max_x - min_x) / width
  pixel_size_y = (max_y - min_y) / height
    
  for x in range(width):
    real = min_x + x * pixel_size_x
    for y in range(height):
      imag = min_y + y * pixel_size_y
      color = mandel(real, imag, iters)
      image[y, x] = color

image = np.zeros((1024, 1536), dtype = np.uint8)
start = timer()
create_fractal(-2.0, 1.0, -1.0, 1.0, image, 20) 
dt = timer() - start

print ("Mandelbrot created in %f s" % dt)
imshow(image)
show() 

Friday, June 26, 2020

Python 3.6.9 : My colab tutorials - part 005.

Today I tested google colab python features with google authentification and google.colab drive and files.
The first part of google colab code comes with authentification and you need to add the verification code for google account.
The google colab use the same version of python:
3.6.9 (default, Apr 18 2020, 01:56:04) [GCC 8.4.0]
You can see all source code on my GitHub account.
The notebook can be found here.

Sunday, April 19, 2020

Python 3.6.9 : My colab tutorials - part 004.

Today, I tested the python module named imdbpy with Colab Google features.
This show you how easy can build and run a simple python script to take data from web sites.
You can see the full example on my GitHub account.

Tuesday, March 17, 2020

Python 3.6.9 : My colab tutorials - part 003.

This tutorial refers to a python module named cirq.
The documentation of this python module can be found on this website.
The development team comes with this intro:
Cirq is a software library for writing, manipulating, and optimizing quantum circuits and then running them against quantum computers and simulators. Cirq attempts to expose the details of hardware, instead of abstracting them away, because, in the Noisy Intermediate-Scale Quantum (NISQ) regime, these details determine whether or not it is possible to execute a circuit at all.
I try to install on Ubuntu but not work:
$ lsb_release -a
No LSB modules are available.
Distributor ID: Ubuntu
Description: Ubuntu 16.04.6 LTS
Release: 16.04
Codename: xenial
...
$ pip3 install cirq --user
Requirement already satisfied: cirq in ./.local/lib/python3.5/site-packages (0.5.556)
...
$ python3 -c 'import cirq; print(cirq.google.Foxtail)'
Traceback (most recent call last):
  File "", line 1, in 
ImportError: No module named 'cirq'
I use it with colab notebook and works very well and I add some basic information about quantum computing with a few examples of this python module.
See my GitHub account with the catafest_004.ipynb notebook example and basic pieces of information.
A very short intro into quantum computing area can be found on this video:

Wednesday, March 4, 2020

Python 3.6.9 : My colab tutorials - part 002.

This is another notebook with the Altair python package.
The development team comes with this intro:
Altair is a declarative statistical visualization library for Python, based on Vega and Vega-Lite.

Altair offers a powerful and concise visualization grammar that enables you to build a wide range of statistical visualizations quickly. Here is an example of using the Altair API to quickly visualize a dataset with an interactive scatter plot:

See the notebook at my GitHub account.

Sunday, March 1, 2020

Python 3.6.9 : My colab tutorials - part 001.

Today I start this tutorials series for the Colab tool.
To share my working with the Colab tool I created this GitHub project.
This project has two colab files :
catafest_001.ipynb  Created using Colaboratory  
catafest_002.ipynb  Created using Colaboratory 
First colab notebook come with a simple tutorial.
The next colab notebook is a little bit more complex and shares more information about how can deal with simples tasks on colab.
This is the table of contests for this colab notebook:
  • Table of contents
  • Select GPU for this notebook
  • Check with nvidia-smi
  • Check whether you have a visible GPU
  • Check with tensoflow test
  • Read information about hardware
  • Check cpuinfo
  • Check meminfo
  • Use Linux commands
  • Use python modules torch and fastai
  • Use python modules
  • Show and get information
  • Enter credentials with Username and Password:
  • Datatime fields
  • Raw fields
  • Number fields
  • Boolean fields
  • Pandas data fields
  • Upload files
  • Upload local files
  • Use the Jupyter Widgets

Thursday, February 27, 2020

Python 3.6.9 : Google give a new tool for python users.

Today I discovered a real surprise gift made by the team from Google for the evolution of programmers.
I say this because not everyone can afford hardware resources.
This gift is a new tool called Colab and uses these versions of python and sys:
Python version
3.6.9 (default, Nov  7 2019, 10:44:02) 
[GCC 8.3.0]
Version info.
sys.version_info(major=3, minor=6, micro=9, releaselevel='final', serial=0)
This utility allows you to run source code that requires online hardware resources using your google account.
Colab allows you to use and share Jupyter notebooks because is an open-source project on which Colab is based.
The types of GPUs that are available in Colab varies over time.
This is necessary for Colab to be able to provide access to these resources for free.
The GPUs available in Colab often include Nvidia K80s, T4s, P4s, and P100s.
This way you can test demanding modules like the python TensorFlow module.
The utility is free but you can pay extra for more hardware resources.
Colab notebooks are stored in Google Drive, or can be loaded from GitHub.
You can see a simple intro with a notebook on my GitHub account.