analitics

Pages

Wednesday, July 13, 2022

Python 3.11.0a7 : local script for update python packages.

If you want to upgrade all local packages from a local script for pip with version greater than 10.0.1 version use a local python script with this source code:
import pkg_resources
from subprocess import call

packages = [dist.project_name for dist in pkg_resources.working_set]
call("pip install --upgrade " + ' '.join(packages), shell=True)
Run it with the python executable and you will see something like this:
C:\Python311alpha>python.exe update_python.py
...
Requirement already satisfied: pip-api in c:\python311alpha\lib\site-packages (0.0.29)
Requirement already satisfied: pypng in c:\python311alpha\lib\site-packages (0.0.21)
Requirement already satisfied: PyGetWindow in c:\python311alpha\lib\site-packages (0.0.9)
Requirement already satisfied: bs4 in c:\python311alpha\lib\site-packages (0.0.1)

Tuesday, July 12, 2022

Python 3.7.13 : My colab tutorials - part 025.

Today I tested a simple data processing example with the first image from NASA's James Webb Space Telescope
You can find this example and more on my GitHub repository for colab.
This is one of results of data processing with a simple logaritm function to see magnitude spectrum of Fourier transform X by shifting the zero-frequency map:

Thursday, July 7, 2022

Blender 3D and python scripting - part 022.

In the last tutorial, we exemplified with the default template from Blender 3D how to create a panel in the Object area.
Today I will show you how to modify this panel with some useful elements for developing an addon.
The purpose of the old tutorial on this is the differences and changes that must be made to the template source code to introduce the following functions:
    StringProperty(
    BoolProperty( 
    IntProperty(
    IntVectorProperty(
    FloatProperty(
    FloatVectorProperty(
    BoolVectorProperty(
Some arguments need to be modified to have different input data, see the selection of colors in the attached image:
I commented on the source code areas in the template and added my changes:
The class also called SceneSettingItem and CollectionProperty is currently being tested and is not finalized to be implemented, it can be seen in panel: 0 items.
It can be seen that any defined class must be registered and unregistered
Here is the source code used to get the new screenshot changes:
import bpy

# Assign a collection
class SceneSettingItem(bpy.types.PropertyGroup):
    name = bpy.props.StringProperty(name="Cube")
    mesh = bpy.props.PointerProperty(type=bpy.types.Mesh)


PROPS = [
            ('myString', bpy.props.StringProperty(name='myString', default='this is my string!')),
            ('myBoolean', bpy.props.BoolProperty(name='myBoolean', default=False)),
            ('myInt', bpy.props.IntProperty(name='myInt', default=1)),
            ('myIntVectorXYZ', bpy.props.IntVectorProperty(subtype='XYZ')),
            ('myFloat', bpy.props.FloatProperty(name='myFloat', default=1)),
            ('myFloatVectorXYZ', bpy.props.FloatVectorProperty(subtype='XYZ')),
            ('myBooleanVector', bpy.props.BoolVectorProperty(size=3)),
            ('myBooleanVectorXYZ', bpy.props.BoolVectorProperty(size=3,subtype='XYZ')),
            ('myBooleanVectorColor', bpy.props.FloatVectorProperty(name="Edit Mode Color", subtype='COLOR',  default=(0.76, 0.0, 0.0), size=3, min=0, max=1)),
            ('myCollectionProperty', bpy.props.CollectionProperty(type=SceneSettingItem)),
        ]    

class HelloWorldPanelVariables(bpy.types.Panel):
    """Creates a Panel in the Object properties window"""
    bl_label = "Hello World Panel Variables"
    bl_idname = "OBJECT_PT_hello"
    bl_space_type = 'PROPERTIES'
    bl_region_type = 'WINDOW'
    bl_context = "object"

#    def draw(self, context):
#        layout = self.layout
#        obj = context.object
#        row = layout.row()
#        row.label(text="Hello world!", icon='WORLD_DATA')
#        row = layout.row()
#        row.label(text="Active object is: " + obj.name)
#        row = layout.row()
#        row.prop(obj, "name")
#        row = layout.row()
#        row.operator("mesh.primitive_cube_add")

    def draw(self, context):
        col = self.layout.column()
        for (prop_name, _) in PROPS:
            row = col.row()
            row.prop(context.scene, prop_name)

        
def register():
    bpy.utils.register_class(SceneSettingItem)
    bpy.utils.register_class(HelloWorldPanelVariables)
    for (prop_name, prop_value) in PROPS:
        setattr(bpy.types.Scene, prop_name, prop_value)

def unregister():
    bpy.utils.unregister_class(SceneSettingItem)
    bpy.utils.unregister_class(HelloWorldPanelVariables)    
    for (prop_name, _) in PROPS:
        delattr(bpy.types.Scene, prop_name)

if __name__ == "__main__":
    register()

Wednesday, July 6, 2022

Blender 3D and python scripting - part 021.

I will continue the series of tutorials with python and the Blender 3D software interface.
From the main menu we can get to the scripting part and here we choose Templates - Python - Ui Panel Simple.
The source code will be added to the python editor.
Save this source code with a name and load it as an addon.
After loading this source code it can be found at Properties at Object, see screenshot.
You can see the source code from the Ui Panel Simple template that I used.
import bpy

class HelloWorldPanel(bpy.types.Panel):
    """Creates a Panel in the Object properties window"""
    bl_label = "Hello World Panel"
    bl_idname = "OBJECT_PT_hello"
    bl_space_type = 'PROPERTIES'
    bl_region_type = 'WINDOW'
    bl_context = "object"

    def draw(self, context):
        layout = self.layout

        obj = context.object

        row = layout.row()
        row.label(text="Hello world!", icon='WORLD_DATA')

        row = layout.row()
        row.label(text="Active object is: " + obj.name)
        row = layout.row()
        row.prop(obj, "name")

        row = layout.row()
        row.operator("mesh.primitive_cube_add")

def register():
    bpy.utils.register_class(HelloWorldPanel)


def unregister():
    bpy.utils.unregister_class(HelloWorldPanel)

if __name__ == "__main__":
    register()

Saturday, July 2, 2022

Python 3.7.10 : Simple example with PyQRCode.

The pyqrcode module is a QR code generator that can automate most of the building process for creating QR codes.
The pypng python library is required to save and upload PNG images.
I had to install them both with the pip utility.
pip install pyqrcode
Collecting pyqrcode
  Using cached PyQRCode-1.2.1-py3-none-any.whl
Installing collected packages: pyqrcode
Successfully installed pyqrcode-1.2.1
WARNING: There was an error checking the latest version of pip.
...
pip install pypng
Collecting pypng
  Using cached pypng-0.0.21-py3-none-any.whl (48 kB)
Installing collected packages: pypng
Successfully installed pypng-0.0.21
WARNING: There was an error checking the latest version of pip.
Let's try some simple examples:
import pyqrcode
url = pyqrcode.create('https://ro.wikipedia.org/wiki/Utilizator:Catalin_Festila', error='H', mode='binary')
url.svg('uca-url.svg', scale=8)
url.eps('uca-url.eps', scale=2)
url.png('code.png', scale=5, module_color=[0, 0, 0, 128], background=[0, 0, 128])
url.show()
print(url.terminal(quiet_zone=1))
This is the result of this source code:

Tuesday, June 28, 2022

Python 3.7.13 : About pip-audit version 2.3.4.

More infos about this python package can be found here.
pip-audit is a tool for scanning Python environments for packages with known vulnerabilities. It uses the Python Packaging Advisory Database (https://github.com/pypa/advisory-database) via the PyPI JSON API as a source of vulnerability reports.
I tested this package feature for colab google with these python packages: unionml, pandas, sklearn and pip-audit.
You can see all vulnerabilities or you can use argument --desc for more information:
!pip-audit
- Auditing zipp (3.8.0)
Found 54 known vulnerabilities in 14 packages
Name          Version  ID                  Fix Versions
------------- -------- ------------------- ----------------------------
dask          2.12.0   PYSEC-2021-387      2021.10.0
distributed   1.25.3   GHSA-j8fq-86c5-5v2r 2021.10.0
httplib2      0.17.4   PYSEC-2020-46       0.18.0
httplib2      0.17.4   PYSEC-2021-16       0.19.0
ipython       5.5.0    PYSEC-2022-12       6.0.0rc1,7.16.3,7.31.1,8.0.1
lxml          4.2.6    PYSEC-2021-19       4.6.3
lxml          4.2.6    PYSEC-2020-62       4.6.2
lxml          4.2.6    PYSEC-2021-852      4.6.5
mpmath        1.2.1    PYSEC-2021-427
notebook      5.3.1    PYSEC-2018-18       5.7.2
notebook      5.3.1    PYSEC-2019-158      5.7.8
notebook      5.3.1    PYSEC-2018-57       5.4.1
notebook      5.3.1    PYSEC-2018-17       5.7.1
notebook      5.3.1    PYSEC-2019-159      5.7.6
notebook      5.3.1    PYSEC-2019-157      5.5.0
notebook      5.3.1    PYSEC-2020-215      6.1.5
notebook      5.3.1    PYSEC-2022-180      6.4.10
notebook      5.3.1    PYSEC-2022-212      6.4.12
notebook      5.3.1    GHSA-hwvq-6gjx-j797 5.7.11,6.4.1
notebook      5.3.1    GHSA-rv62-4pmj-xw6h 5.7.8
numpy         1.21.6   GHSA-fpfv-jqm9-f5jm 1.22
opencv-python 4.1.2.30 GHSA-8849-5h85-98qw
opencv-python 4.1.2.30 GHSA-m6vm-8g8v-xfjh
opencv-python 4.1.2.30 GHSA-q799-q27x-vp7w 4.2.0.32
pillow        7.1.2    PYSEC-2021-137      8.2.0
pillow        7.1.2    PYSEC-2021-138      8.2.0
pillow        7.1.2    PYSEC-2021-70       8.1.0
pillow        7.1.2    PYSEC-2021-331      8.3.0
pillow        7.1.2    PYSEC-2021-41       8.1.1
pillow        7.1.2    PYSEC-2021-71       8.1.0
pillow        7.1.2    PYSEC-2021-69       8.1.0
pillow        7.1.2    PYSEC-2021-38       8.1.1
pillow        7.1.2    PYSEC-2021-139      8.2.0
pillow        7.1.2    PYSEC-2021-94       8.2.0
pillow        7.1.2    PYSEC-2021-39       8.1.1
pillow        7.1.2    PYSEC-2021-36       8.1.1
pillow        7.1.2    PYSEC-2021-40       8.1.1
pillow        7.1.2    PYSEC-2021-37       8.1.1
pillow        7.1.2    PYSEC-2021-317      8.3.2
pillow        7.1.2    PYSEC-2021-35       8.1.1
pillow        7.1.2    PYSEC-2021-93       8.2.0
pillow        7.1.2    PYSEC-2021-42       8.1.1
pillow        7.1.2    PYSEC-2021-92       8.2.0
pillow        7.1.2    PYSEC-2022-10       9.0.0
pillow        7.1.2    PYSEC-2022-9        9.0.0
pillow        7.1.2    PYSEC-2022-8        9.0.0
pillow        7.1.2    PYSEC-2022-168      9.0.1
pillow        7.1.2    GHSA-jgpv-4h4c-xhw3 8.1.2
pillow        7.1.2    GHSA-4fx9-vc88-q2xc 9.0.0
psutil        5.4.8    PYSEC-2019-41       5.6.6
pygments      2.6.1    PYSEC-2021-140      2.7.4
pygments      2.6.1    PYSEC-2021-141      2.7.4
urllib3       1.25.11  PYSEC-2021-108      1.26.5
werkzeug      1.0.1    PYSEC-2022-203      2.1.1
Name                    Skip Reason
----------------------- ------------------------------------------------------------------------------------------------
dlib                    Dependency not found on PyPI and could not be audited: dlib (19.18.0+zzzcolab20220513001918)
en-core-web-sm          Dependency not found on PyPI and could not be audited: en-core-web-sm (3.3.0)
jaxlib                  Dependency not found on PyPI and could not be audited: jaxlib (0.3.7+cuda11.cudnn805)
pygobject               Dependency not found on PyPI and could not be audited: pygobject (3.26.1)
screen-resolution-extra Dependency not found on PyPI and could not be audited: screen-resolution-extra (0.0.0)
tensorflow              Dependency not found on PyPI and could not be audited: tensorflow (2.8.2+zzzcolab20220527125636)
torch                   Dependency not found on PyPI and could not be audited: torch (1.11.0+cu113)
torchaudio              Dependency not found on PyPI and could not be audited: torchaudio (0.11.0+cu113)
torchvision             Dependency not found on PyPI and could not be audited: torchvision (0.12.0+cu113)
xkit                    Dependency not found on PyPI and could not be audited: xkit (0.0.0)

Sunday, June 26, 2022

Blender 3D and python scripting - part 020.

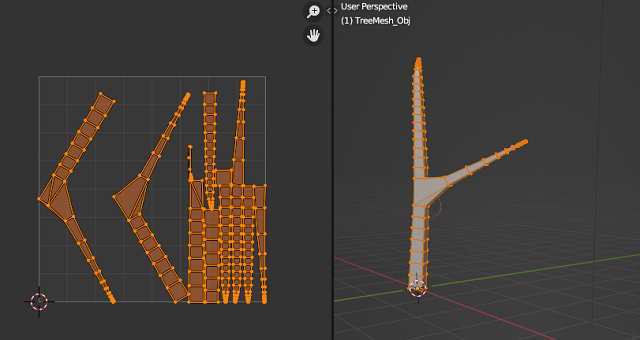
So far I have added or branched used python scripts in the blender and created a UV texture for this use UV Smart projection.
The resulting script is quite large in content.
I thought I should create an addon to use and show you how to do it.
Let's follow the basic steps when working with python scripts in Blender 3D.
  1. go to the tag named: Scripting;
  2. use main menu to create a new script from Text - New;
  3. use main menu - Template - Python - Addon Add Object;
  4. save the script with a good name, I used: addon_catafest_add_branch.py;
  5. save the blend file with a good name: I used: addon_catafest_add_branch.blend;
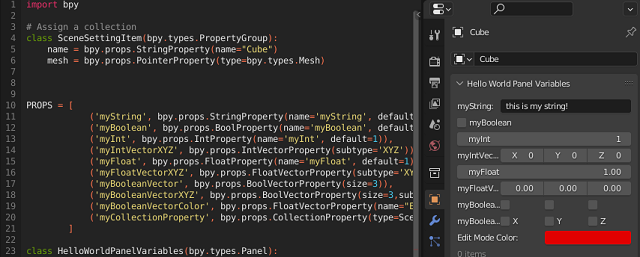
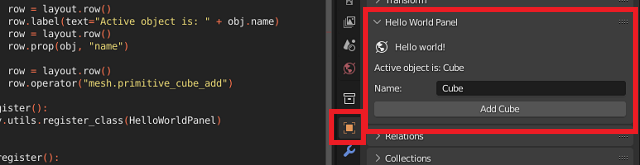
See this screenshot:
After these changes you can modify in the template file the parts related to the names, descriptions and other elements that will be viewed in Blender 3D
Restart the Blender 3D software, open the python script with all changes and run it.
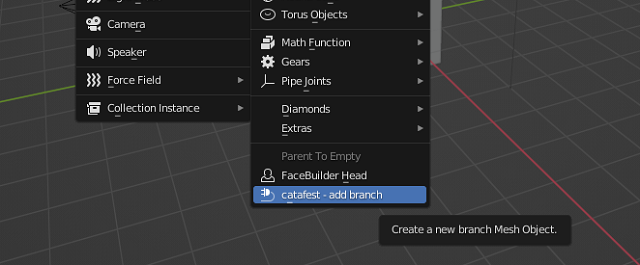
In the 3D Viewport area press the shortkeys: Shift + A and use Mesh menu to see this addon feature, see screenshot:
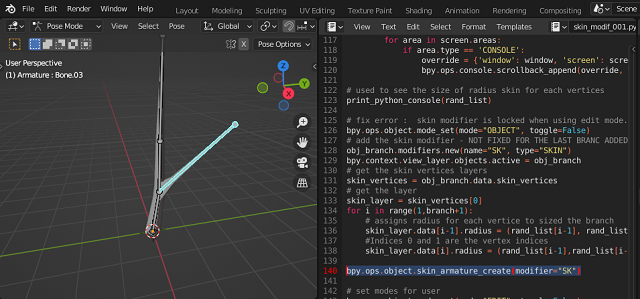
This is source code I used:
bl_info = {
    "name": "New branch",
    "author": "Your Name Here",
    "version": (1, 0),
    "blender": (3, 3, 0),
    "location": "View3D > Add > Mesh > New Object",
    "description": "Adds a new branch Mesh Object",
    "warning": "",
    "doc_url": "",
    "category": "Add Mesh",
}


import bpy
from bpy.types import Operator
from bpy.props import FloatVectorProperty
from bpy_extras.object_utils import AddObjectHelper, object_data_add
from mathutils import Vector


def add_object(self, context):
    scale_x = self.scale.x
    scale_y = self.scale.y

    verts = [
        Vector((-1 * scale_x, 1 * scale_y, 0)),
        Vector((1 * scale_x, 1 * scale_y, 0)),
        Vector((1 * scale_x, -1 * scale_y, 0)),
        Vector((-1 * scale_x, -1 * scale_y, 0)),
    ]

    edges = []
    faces = [[0, 1, 2, 3]]

    mesh = bpy.data.meshes.new(name="New Object Mesh")
    mesh.from_pydata(verts, edges, faces)
    # useful for development when the mesh may be invalid.
    # mesh.validate(verbose=True)
    object_data_add(context, mesh, operator=self)


class OBJECT_OT_add_object(Operator, AddObjectHelper):
    """Create a new branch Mesh Object"""
    bl_idname = "mesh.add_object"
    bl_label = "Add Mesh Object"
    bl_options = {'REGISTER', 'UNDO'}

    scale: FloatVectorProperty(
        name="scale",
        default=(1.0, 1.0, 1.0),
        subtype='TRANSLATION',
        description="scaling",
    )

    def execute(self, context):

        add_object(self, context)

        return {'FINISHED'}


# Registration

def add_object_button(self, context):
    self.layout.operator(
        OBJECT_OT_add_object.bl_idname,
        text="catafest - add branch",
        icon='PLUGIN')


# This allows you to right click on a button and link to documentation
def add_object_manual_map():
    url_manual_prefix = "https://docs.blender.org/manual/en/latest/"
    url_manual_mapping = (
        ("bpy.ops.mesh.add_object", "scene_layout/object/types.html"),
    )
    return url_manual_prefix, url_manual_mapping


def register():
    bpy.utils.register_class(OBJECT_OT_add_object)
    bpy.utils.register_manual_map(add_object_manual_map)
    bpy.types.VIEW3D_MT_mesh_add.append(add_object_button)


def unregister():
    bpy.utils.unregister_class(OBJECT_OT_add_object)
    bpy.utils.unregister_manual_map(add_object_manual_map)
    bpy.types.VIEW3D_MT_mesh_add.remove(add_object_button)


if __name__ == "__main__":
    register()

Saturday, June 18, 2022

Blender 3D and python scripting - part 019.

Today I'm going to show you how to have a UV map for the entire mesh of the object created with the smart projection mode.
It's the same when you create a UV map using UV Mapping - Smart UV Project in the UV Editing view.
In principle, everything created in the Blender 3D interface has an equivalent in the A.P.I. of the 3D Blender.
You can see a screenshot with this script:
Here you see the source code that includes this option.
import bpy
import random

# import bmesh 
import bmesh

MinNubmer = -10
MaxNumber = 10

# Clean up the area , uncoment the next two row to keep
# branch after running the script
#bpy.ops.object.select_all(action="SELECT")
#bpy.ops.object.delete()

# Number of branches
branch = 4
# Create the verts array
verts = [(0,0,0)]
# Create the edges array
edges = [(0,0)]
# Create the faces array
faces = []

# define random number for X and Y axis 
def RN():
    return  random.randint(MinNubmer, MaxNumber) / 20 

# define random number for positive Z axis
def RNZ():
    return  random.randint(10, 50) / 10  

# create a list of branch thicknesses
rand_list = []

name_branch = "TreeMesh"
# define createBranch 

def createBranch(branch, name_branch):
    # Create the mesh for branch 
    mesh = bpy.data.meshes.new(name_branch) 
    for i in range(1,branch):
        rand_list.append(RNZ()/30)
        # sort all reverse by thicknesses
        rand_list.sort(reverse=True)

    # generate vertices list for drawing the branch
    for i in range(1,branch):
        verts.append((rand_list[i-1] +0.1,rand_list[i-1]+0.1,RNZ()))
        edges.append((i-1,i))
    
    # sort the list of vertices by last number witch is Z axis 
    verts.sort(key=lambda x: x[2])
    # create branch update and validate, see documentation
    mesh.from_pydata(verts, edges, faces) 
    mesh.update()
    mesh.validate()
    # Create object to hold the mesh branch with the new name for object
    obj = bpy.data.objects.new(name_branch+'_Obj', mesh)
    return obj

# create a new branch     
def createNewBranch(obj_branch, n):
    bpy.ops.object.mode_set(mode="EDIT", toggle=False)
    me = obj_branch.data
    bm = bmesh.from_edit_mesh(me)
    bm.select_mode = {'VERT'}

    for i,v in enumerate(bm.verts):
        # select only by the index of list 
        if i == n:
            v.select = ( v.co.x > 0.0 )
            v2 = v    
        else: 
            v.select = False
    # flush and update view 
    v1 = bm.verts.new( (RN()+(v.co.x) + 1.0 , RN()+(v.co.y) + 1.0 , (v.co.z) - (v.co.z)/3) )
    #v1 = bm.verts.new(1, 1, 3)
    bm.edges.new((v1, v2))
    rand_list.append(0.01)
    rand_list.sort(reverse=True)
    # update 
    bm.select_flush_mode()   
    me.update()
    #mesh.validate()
    #bmesh.update_edit_mesh(obj_branch.data)
    

# use the createBranch
obj_branch = createBranch(branch, name_branch)


## now set up shape key in Blender
#mesh=obj_branch.data
#sk_basis = obj_branch.shape_key_add(name='Basis',from_mix=False)
#sk_basis.interpolation = 'KEY_LINEAR'
## must set relative to false here
#obj_branch.data.shape_keys.use_relative = False

## create new shape key
#sk = obj_branch.shape_key_add(name='Deform',from_mix=False)
#sk.interpolation = 'KEY_LINEAR'
#sk.slider_min = 0
#sk.slider_max = 2

# ... and add it to the scene
scene = bpy.context.scene
scene.collection.objects.link(obj_branch)

# this will fix the error ...  mode_set_poll()
bpy.context.view_layer.objects.active = obj_branch  

createNewBranch(obj_branch, 1)

# print tool for developing area 
def print_python_console(data):
    for window in bpy.context.window_manager.windows:
        screen = window.screen
        for area in screen.areas:
            if area.type == 'CONSOLE':
                override = {'window': window, 'screen': screen, 'area': area}
                bpy.ops.console.scrollback_append(override, text=str(data), type="OUTPUT")

# used to see the size of radius skin for each vertices
print_python_console(rand_list)

# fix error :  skin modifier is locked when using edit mode.
bpy.ops.object.mode_set(mode="OBJECT", toggle=False)
# add the skin modifier - NOT FIXED FOR THE LAST BRANC ADDED
obj_branch.modifiers.new(name="SK", type="SKIN")
bpy.context.view_layer.objects.active = obj_branch  
# get the skin vertices layers
skin_vertices = obj_branch.data.skin_vertices
# get the layer
skin_layer = skin_vertices[0]
for i in range(1,branch+1):
    # assigns radius for each vertice to sized the branch 
    skin_layer.data[i-1].radius = (rand_list[i-1], rand_list[i-1]) 
    #Indices 0 and 1 are the vertex indices
    skin_layer.data[i].radius = (rand_list[i-1],rand_list[i-1])

# this will apply the modifier named 'SK'
bpy.ops.object.modifier_apply( modifier = 'SK' )
#
bpy.ops.object.mode_set(mode="EDIT", toggle=True)
bpy.ops.object.skin_root_mark()

bpy.ops.object.mode_set(mode="OBJECT", toggle=True)
# set modes for user 

mesh = bpy.data.meshes.new(name_branch+'_Obj') 
mesh.update()
mesh.validate()

import math 

def get_dimension(normal):
    x_abs = math.fabs(normal[0])
    y_abs = math.fabs(normal[1])
    z_abs = math.fabs(normal[2])
    if z_abs >= x_abs and z_abs >= y_abs:
        return 2
    elif x_abs >= y_abs:
        return 0
    else:
        return 1

texture_scale = 1.0
bpy.ops.object.mode_set(mode="EDIT", toggle=True)  
bpy.ops.mesh.select_all(action='SELECT')  
me = obj_branch.data
bm = bmesh.from_edit_mesh(me)

bpy.ops.uv.sphere_project()

uv_layer = bm.loops.layers.uv.verify()

# adjust uv coordinates
for face in bm.faces:
    for l in face.loops:
        luv = l[uv_layer]
        # select UV vertex if these are in certain range
        if 0 <= luv.uv.x <= 1 and 0 <= luv.uv.y <= 1:
            luv.select = True
            luv = l[uv_layer]
            luv.uv = l.vert.co.yz * texture_scale
            luv.uv = l.vert.co.xz * texture_scale
            luv.uv = l.vert.co.xy * texture_scale
                
bmesh.update_edit_mesh(me) 
me.update()  

bpy.ops.object.mode_set(mode='EDIT')
bpy.ops.mesh.select_all(action='SELECT')
bpy.ops.uv.smart_project(angle_limit=1.15192, island_margin=0, area_weight=0, correct_aspect=True, scale_to_bounds=False)
# use this for cylinder project for UV map 
#bpy.ops.uv.cylinder_project(direction='ALIGN_TO_OBJECT',
#align='POLAR_ZX',
#radius=1.0,
#correct_aspect=True,
#clip_to_bounds=False,
#scale_to_bounds=True)


bmesh.update_edit_mesh(me)
bpy.ops.object.mode_set(mode="OBJECT", toggle=True)

Thursday, June 16, 2022

Blender 3D and python scripting - part 018.

In this tutorial I will show you how to create a UV map.
I searched the web and the documentation briefly and I didn't find anything very concrete, but here I created a functional example.
The example contains a function that calculates dimensions, which are then processed and added to the UV Editing workspace.
This is what the source code added to the initial script tested looks like:
mesh.validate()

import math 

def get_dimension(normal):
    x_abs = math.fabs(normal[0])
    y_abs = math.fabs(normal[1])
    z_abs = math.fabs(normal[2])
    if z_abs >= x_abs and z_abs >= y_abs:
        return 2
    elif x_abs >= y_abs:
        return 0
    else:
        return 1

texture_scale = 1.0
bpy.ops.object.mode_set(mode="EDIT", toggle=True)    
me = obj_branch.data
bm = bmesh.from_edit_mesh(me)

uv_layer = bm.loops.layers.uv.verify()


for f in bm.faces:
    largest_index = get_dimension(f.normal)
    for l in f.loops:
        luv = l[uv_layer]
        luv.uv = l.vert.co.yz * texture_scale
        luv.uv = l.vert.co.xz * texture_scale
        luv.uv = l.vert.co.xy * texture_scale


me.update()
Here is a screenshot of the result, you can see that it only shows the node, you can select for all nodes to see a final result.

Tuesday, June 14, 2022

Blender 3D and python scripting - part 017.

In this tutorial I will show you how you can apply an modifier in Blender 3D using the python script.
First, you need to comment these source code rows in order to allow to apply the modifier.
## now set up shape key in Blender
#mesh=obj_branch.data
#sk_basis = obj_branch.shape_key_add(name='Basis',from_mix=False)
#sk_basis.interpolation = 'KEY_LINEAR'
## must set relative to false here
#obj_branch.data.shape_keys.use_relative = False

## create new shape key
#sk = obj_branch.shape_key_add(name='Deform',from_mix=False)
#sk.interpolation = 'KEY_LINEAR'
#sk.slider_min = 0
#sk.slider_max = 2
You cannot aply an modifier if you have skape keys.
To apply an modifyer you can use this line of source code:
# this will apply the modifier named 'SK'
bpy.ops.object.modifier_apply( modifier = 'SK' )
If you go to the UV Editing area you will see the modifier is apply and you can create an UV map.

Monday, June 13, 2022

Blender 3D and python scripting - part 016.

On this day, I will digress from the series of tutorials started and presented and show you how to install other python packages in Blender 3D.
Go to the bin folder where the python is install, see my path of Blender 3D.
C:\blender-3.3.0-alpha+master.add1da52ad78-windows.amd64-release\3.3\python\bin
Use these commands in to window command shell to install OpenCv python module.
python.exe -m ensurepip
python.exe -m pip install --upgrade pip
python.exe -m pip install opencv-python 
python.exe -m pip install opencv-contrib-python
Run in the blender script area these commands, in order to see if this python package working.
import cv2
cv2.version
You can create a simple script and test it, see the next example:
import numpy as np
import cv2
  
# Creating a black image with 3 channels
# RGB and unsigned int datatype
img = np.zeros((400, 400, 3), dtype = "uint8")
  
# Creating line
cv2.line(img, (21, 167), (100, 99), (0, 0, 255), 8)
  
cv2.imshow('dark', img)
  
# Allows us to see image
# until closed forcefully
cv2.waitKey(0)
cv2.destroyAllWindows()
You can see a screenshot with this python script:

Sunday, June 12, 2022

Blender 3D and python scripting - part 015.

The tutorial for today is about adding armature to the skin, and has a single line of source code:
bpy.ops.object.skin_armature_create(modifier="SK")
This will add an armature with bones for each edge based on the skin modifier.
See the result of this ...
The full source code is this:
import bpy
import random

# import bmesh 
import bmesh

MinNubmer = -10
MaxNumber = 10

# Clean up the area , uncoment the next two row to keep
# branch after running the script
#bpy.ops.object.select_all(action="SELECT")
#bpy.ops.object.delete()

# Number of branches
branch = 4
# Create the verts array
verts = [(0,0,0)]
# Create the edges array
edges = [(0,0)]
# Create the faces array
faces = []

# define random number for X and Y axis 
def RN():
    return  random.randint(MinNubmer, MaxNumber) / 20 

# define random number for positive Z axis
def RNZ():
    return  random.randint(10, 50) / 10  

# create a list of branch thicknesses
rand_list = []

name_branch = "TreeMesh"
# define createBranch 

def createBranch(branch, name_branch):
    # Create the mesh for branch 
    mesh = bpy.data.meshes.new(name_branch) 
    for i in range(1,branch):
        rand_list.append(RNZ()/30)
        # sort all reverse by thicknesses
        rand_list.sort(reverse=True)

    # generate vertices list for drawing the branch
    for i in range(1,branch):
        verts.append((rand_list[i-1] +0.1,rand_list[i-1]+0.1,RNZ()))
        edges.append((i-1,i))

    # sort the list of vertices by last number witch is Z axis 
    verts.sort(key=lambda x: x[2])
    # create branch update and validate, see documentation
    mesh.from_pydata(verts, edges, faces) 
    mesh.update()
    mesh.validate()
    # Create object to hold the mesh branch with the new name for object
    obj = bpy.data.objects.new(name_branch+'_Obj', mesh)
    return obj

# create a new branch     
def createNewBranch(obj_branch, n):
    bpy.ops.object.mode_set(mode="EDIT", toggle=False)
    me = obj_branch.data
    bm = bmesh.from_edit_mesh(me)
    bm.select_mode = {'VERT'}

    for i,v in enumerate(bm.verts):
        # select only by the index of list 
        if i == n:
            v.select = ( v.co.x > 0.0 )
            v2 = v    
        else: 
            v.select = False
    # flush and update view 
    v1 = bm.verts.new( (RN()+(v.co.x) + 1.0 , RN()+(v.co.y) + 1.0 , (v.co.z) - (v.co.z)/3) )
    #v1 = bm.verts.new(1, 1, 3)
    bm.edges.new((v1, v2))
    rand_list.append(0.01)
    rand_list.sort(reverse=True)
    # update 
    bm.select_flush_mode()   
    me.update()
    #mesh.validate()
    #bmesh.update_edit_mesh(obj_branch.data)

# use the createBranch
obj_branch = createBranch(branch, name_branch)


# now set up shape key in Blender
mesh=obj_branch.data
sk_basis = obj_branch.shape_key_add(name='Basis',from_mix=False)
sk_basis.interpolation = 'KEY_LINEAR'
# must set relative to false here
obj_branch.data.shape_keys.use_relative = False

# create new shape key
sk = obj_branch.shape_key_add(name='Deform',from_mix=False)
sk.interpolation = 'KEY_LINEAR'
sk.slider_min = 0
sk.slider_max = 2

# ... and add it to the scene
scene = bpy.context.scene
scene.collection.objects.link(obj_branch)

# this will fix the error ...  mode_set_poll()
bpy.context.view_layer.objects.active = obj_branch  

createNewBranch(obj_branch, 1)

# print tool for developing area 
def print_python_console(data):
    for window in bpy.context.window_manager.windows:
        screen = window.screen
        for area in screen.areas:
            if area.type == 'CONSOLE':
                override = {'window': window, 'screen': screen, 'area': area}
                bpy.ops.console.scrollback_append(override, text=str(data), type="OUTPUT")

# used to see the size of radius skin for each vertices
print_python_console(rand_list)

# fix error :  skin modifier is locked when using edit mode.
bpy.ops.object.mode_set(mode="OBJECT", toggle=False)
# add the skin modifier
obj_branch.modifiers.new(name="SK", type="SKIN")
bpy.context.view_layer.objects.active = obj_branch  
# get the skin vertices layers
skin_vertices = obj_branch.data.skin_vertices
# get the layer
skin_layer = skin_vertices[0]
for i in range(1,branch+1):
    # assigns radius for each vertice to sized the branch 
    skin_layer.data[i-1].radius = (rand_list[i-1], rand_list[i-1]) 
    #Indices 0 and 1 are the vertex indices
    skin_layer.data[i].radius = (rand_list[i-1],rand_list[i-1])

bpy.ops.object.skin_armature_create(modifier="SK")

# set modes for user 
bpy.ops.object.mode_set(mode="EDIT", toggle=False)
bpy.ops.object.skin_root_mark()
bpy.ops.object.mode_set(mode="OBJECT", toggle=False)

Saturday, June 11, 2022

Blender 3D and python scripting - part 014.

In this tutorial I will show you how can add a shape key to the branch using this source code:
# now set up shape key in Blender
mesh=obj_branch.data
sk_basis = obj_branch.shape_key_add(name='Basis',from_mix=False)
sk_basis.interpolation = 'KEY_LINEAR'
# must set relative to false here
obj_branch.data.shape_keys.use_relative = False

# create new shape key
sk = obj_branch.shape_key_add(name='Deform',from_mix=False)
sk.interpolation = 'KEY_LINEAR'
sk.slider_min = 0
sk.slider_max = 2

# ... and add it to the scene