analitics

Pages

Thursday, January 5, 2023

Python Qt6 : Create a tray icon application.

The notification area known as system tray is located in the Windows Taskbar area, usually at the bottom right corner.
I tested with:
Python 3.10.2 (tags/v3.10.2:a58ebcc, Jan 17 2022, 14:12:15) [MSC v.1929 64 bit (AMD64)] on win32
...
pip show pyqt6
Name: PyQt6
Version: 6.4.0
Summary: Python bindings for the Qt cross platform application toolkit
I created a trayicon application with PyQt6 that show a menu with two entry: Show Window and Exit.
The Show Window will sow a default window and the Exit will close the application.
This is the source code I tested, you need an icon.png in the same folder with this script.
import sys
from PyQt6.QtCore import Qt, QEvent, QPoint
from PyQt6.QtGui import QGuiApplication, QIcon, QAction
from PyQt6.QtWidgets import QApplication, QSystemTrayIcon, QMainWindow, QMenu

# create the default application
app = QApplication(sys.argv)

# create the main window
window = QMainWindow()
# set the title for the window
window.setWindowTitle("My Window")

# this set the tray icon and menu
tray_icon = QSystemTrayIcon()
tray_icon.setIcon(QIcon("icon.png"))
menu = QMenu()

# add an action to the menu to show the window
show_window_action = QAction("Show Window", None)
show_window_action.triggered.connect(window.show)
menu.addAction(show_window_action)

# add an action to the menu to exit the application
exit_action = QAction("Exit", None)
exit_action.triggered.connect(app.quit)
menu.addAction(exit_action)

# set the context menu
tray_icon.setContextMenu(menu)

# show the tray icon
tray_icon.show()

# run the application
app.exec()

Tuesday, January 3, 2023

Python 3.10.2 : about ChemSpiPy.

ChemSpiPy provides a way to interact with ChemSpider in Python. It allows chemical searches, chemical file downloads, depiction and retrieval of chemical properties...
You can read more about this python package on the official website and the documentation for this python package.
You have to create an account and fill in the data to get an A.P.I key...
This is the source code for this python package , I use PyQt6 to show image formula with:QPixmap.fromImage.
import chemspipy

# set the API key from https://developer.rsc.org/my-apps/
api_key = "... your A.P.I. key ..."

# import the ChemSpider class
from chemspipy import ChemSpider

# instance of the ChemSpider class
cs_inst = ChemSpider(api_key)

compound_name = "Glucose"
# search for compound: "Glucose"
compounds  = cs_inst.search(compound_name) 

# get the first compound in the list
compound = compounds[0]

# print the list of the attributes and methods of 'compound' object
print(dir(compound))

# Print the compound's properties
print("... some compound's properties !")
print(f"Name: {compound.common_name}")
print(f"Average_mass: {compound.average_mass}")
print(f"ChemSpider ID - csid: {compound.csid}")
#print(f" external_references: {compound.external_references}")
#print(f" image: {compound.image}")
#print(f" mol_2d: {compound.mol_2d}")
#print(f" mol_3d: {compound.mol_3d}")
print(f" molecular_formula: {compound.molecular_formula}")
print(f" molecular_weight: {compound.molecular_weight}")
print(f" monoisotopic_mass: {compound.monoisotopic_mass}")
print(f" nominal_mass: {compound.nominal_mass}")


import sys
from PyQt6.QtCore import Qt
from PyQt6.QtGui import QPixmap, QImage, QColor
from PyQt6.QtWidgets import QApplication, QMainWindow, QLabel

# Create the application
app = QApplication(sys.argv)

# Create the main window
window = QMainWindow()
window.setWindowTitle(compound_name)

# Load the image with fromData
image = QImage.fromData(compound.image)

# Create a label to display the image
label = QLabel()
label.setPixmap(QPixmap.fromImage(image))

# Set the label as the central widget of the window
window.setCentralWidget(label)

# Show the window
window.show()

# Run the application
app.exec()
This is the result of running the source code:

Python 3.10.2 : testing the NASA A.P.I. features.

In this tutorial I will show you how to deal with the NASA A.P.I. and python programming language.
This source code was build and tested yesterday.
This is the source code:
import requests
from datetime import date

today_data = date.today()
today = today_data.strftime("%d%m%Y")
import urllib.parse

# set your API key from nasa https://api.nasa.gov/#NHATS
api_key = "... your A.P.I. key ..."

# this is a simple example to get one day image 
base_url = "https://api.nasa.gov/planetary/apod"

# set the parameters for the API request
params = {
    "api_key": api_key
}

# the request to the API
response = requests.get(base_url, params=params)

# get data
if response.status_code == 200:
    # parse the response
    data = response.json()

    # print the image URL
    print(data["url"])
    # parse the URL
    parsed_url = urllib.parse.urlparse(data["url"])

    # extract the file name from the URL
    file_name = parsed_url.path.split("/")[-1]
    # save the image
    response_image = requests.get(data["url"])
    with open(today+'_'+file_name, "wb") as f:
        f.write(response_image.content)
else:
    # print the status code
    print(response.status_code)
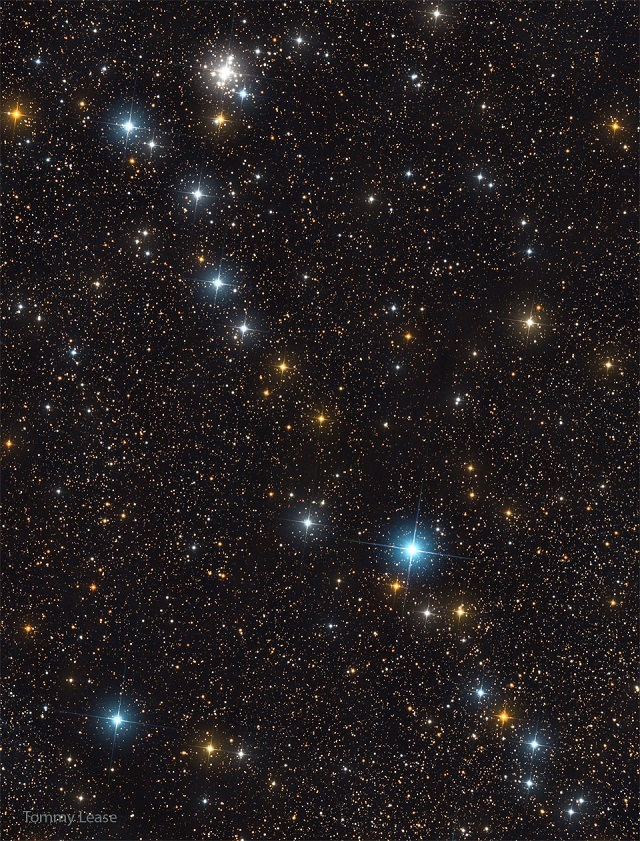
I run the source code and I get these two images ...
...
01/03/2023  01:06 AM            86,943 03012023_AllPlanets_Tezel_1080_annotated.jpg
01/03/2023  04:22 PM           553,426 03012023_KembleCascade_Lease_960.jpg
...

Manim python example.

I have written before about manim as a Python package in this tutorial.
It's quite powerful for animation and I recommend it to content producers who need a tool for school board-like graphics.
Today I'm back with a link that a document written in Jupiter notebook with Manim package from manim community, see this link.

Monday, January 2, 2023

News : PyTorch machine learning framework compromised with malicious dependency.

If you installed PyTorch-nightly on Linux via pip between December 25, 2022 and December 30, 2022, please uninstall it and torchtriton immediately, and use the latest nightly binaries (newer than Dec 30th 2022).
Read more on the official website.

Python Qt6 : Show any CSV file with QTableWidget.

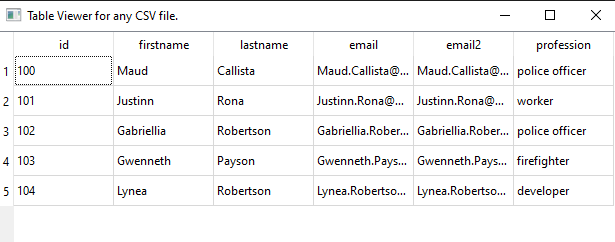
In this tutorial, I will show you how easy it is to work with PyQt6 and QTableWidget to display any CSV file.
The source code lines are already commented to understand how this source code works.
This is the content of the csv file named my.csv:
id,firstname,lastname,email,email2,profession
100,Maud,Callista,Maud.Callista@yopmail.com,Maud.Callista@gmail.com,police officer
101,Justinn,Rona,Justinn.Rona@yopmail.com,Justinn.Rona@gmail.com,worker
102,Gabriellia,Robertson,Gabriellia.Robertson@yopmail.com,Gabriellia.Robertson@gmail.com,police officer
103,Gwenneth,Payson,Gwenneth.Payson@yopmail.com,Gwenneth.Payson@gmail.com,firefighter
104,Lynea,Robertson,Lynea.Robertson@yopmail.com,Lynea.Robertson@gmail.com,developer
This is the source I used:
import sys
import csv
from PyQt6.QtWidgets import QApplication, QMainWindow, QTableWidget, QTableWidgetItem
from PyQt6.QtCore import Qt

# the main window class
class MainWindow(QMainWindow):
    # the init definition of the class
    def __init__(self):
        super().__init__()

        # the window title
        self.setWindowTitle('Table Viewer for any CSV file.')

        # this create the table widget
        self.table = QTableWidget(self)

        # the table dimensions is set default
        self.table.setColumnCount(0)
        self.table.setRowCount(0)

        # this read the CSV file named my.csv
        with open('my.csv', 'r') as file:
            # use the reader for file 
            reader = csv.reader(file)
            # this get the column labels from the first row
            headers = next(reader)
            # this set the number of columns based on the number of headers
            self.table.setColumnCount(len(headers))
            # this set the horizontal header labels
            self.table.setHorizontalHeaderLabels(headers)
            # for each row iterate the rows in the CSV file
            for row in reader:
                # add a row to the table
                row_index = self.table.rowCount()
                self.table.insertRow(row_index)
                # add data to cells 
                for col_index, cell in enumerate(row):
                    self.table.setItem(row_index, col_index, QTableWidgetItem(cell))
        
        # setting for the table as the central widget
        self.setCentralWidget(self.table)

# this run the application
if __name__ == '__main__':
    app = QApplication(sys.argv)
    window = MainWindow()
    window.show()
    sys.exit(app.exec())
Here is what the result of running the source code: